


Resources
The Ultimate Foundation Crack Fix That Actually Works
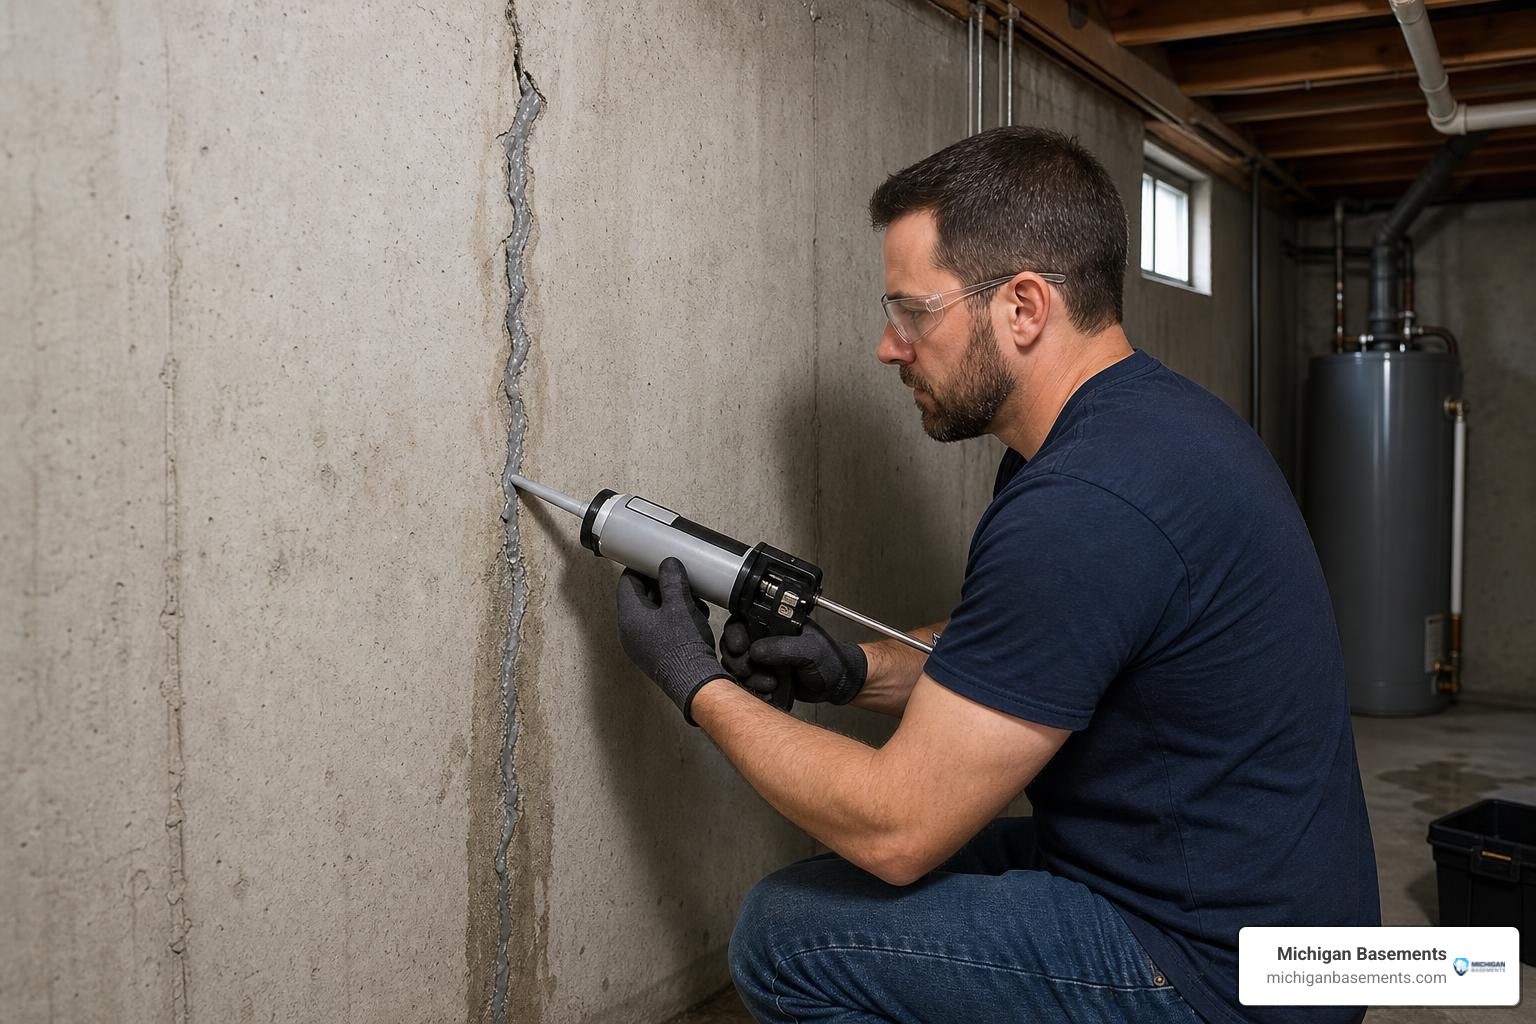
The Ultimate Foundation Crack Fix That Actually Works
Why Repairing Basement Wall Cracks the Right Way Matters
Repairing basement wall cracks the right way depends on knowing what kind of crack you’re dealing with and what’s causing it. Here’s a quick overview:
| Crack Type | Likely Cause | DIY or Pro? |
|---|---|---|
| Hairline vertical | Concrete curing/shrinkage | DIY (monitor first) |
| Vertical/diagonal, leaking | Hydrostatic pressure, settling | DIY with polyurethane kit |
| Stair-step (block walls) | Soil pressure, settling | Pro evaluation |
| Horizontal or bowing | Lateral soil/hydrostatic pressure | Pro — structural risk |
The short answer:
- Small, stable, hairline cracks? Monitor them. Seal with a DIY epoxy or polyurethane kit if they leak.
- Wet, actively leaking cracks? Use polyurethane injection — it expands and seals even in wet conditions.
- Horizontal, bowing, or widening cracks? Stop. Call a professional before doing anything else.
Most foundation cracks look scarier than they are. Concrete naturally shrinks as it cures, and minor settling is a normal part of any home’s life. But in Southeast Michigan — where clay-heavy soils expand and contract with every wet season and freeze-thaw cycle — even a modest crack can become a real problem fast. Saturated soil builds up hydrostatic pressure against your foundation walls. That pressure doesn’t just cause leaks. Left unaddressed, it can split solid concrete and bow walls inward.
There’s a specific kind of homeowner dread that comes about 12 hours after a heavy rain, when you head downstairs and notice a wet patch on the wall that wasn’t there last week. Before you start calling contractors for $6,000 interior drainage quotes, it’s worth understanding exactly what you’re looking at — because the right fix for your crack might cost $60 and a Saturday afternoon.
I’m Dominic Hesano, owner of Michigan Basements. Our company provides expert basement waterproofing and foundation repair services throughout Southeast Michigan, including Oakland County, Macomb County, and Wayne County. I’ve spent years repairing basement wall cracks across Metro Detroit — from simple shrinkage cracks in newer poured concrete walls to severely bowed block foundations that had been leaking for decades. This guide gives you the same straight answers I’d give a neighbor: what’s serious, what isn’t, and exactly how to fix it.
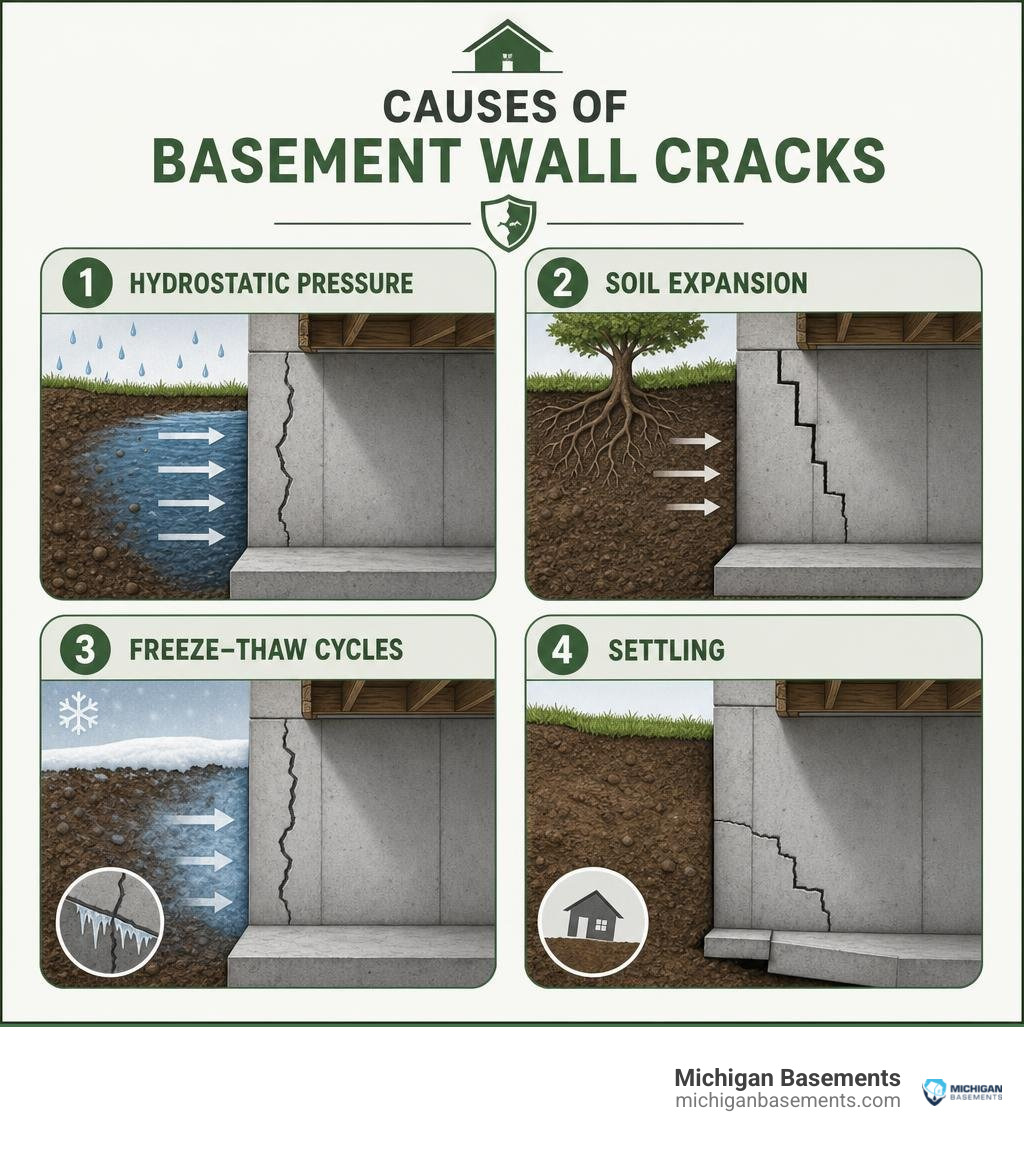
Why Basement Walls Crack and How to Diagnose Them
Before you grab a wire brush or buy a DIY injection kit, you need to “read” the crack. Cracks are symptoms of physical forces acting on your home. If you don’t understand the underlying force, you risk applying a cosmetic band-aid to a structural emergency.
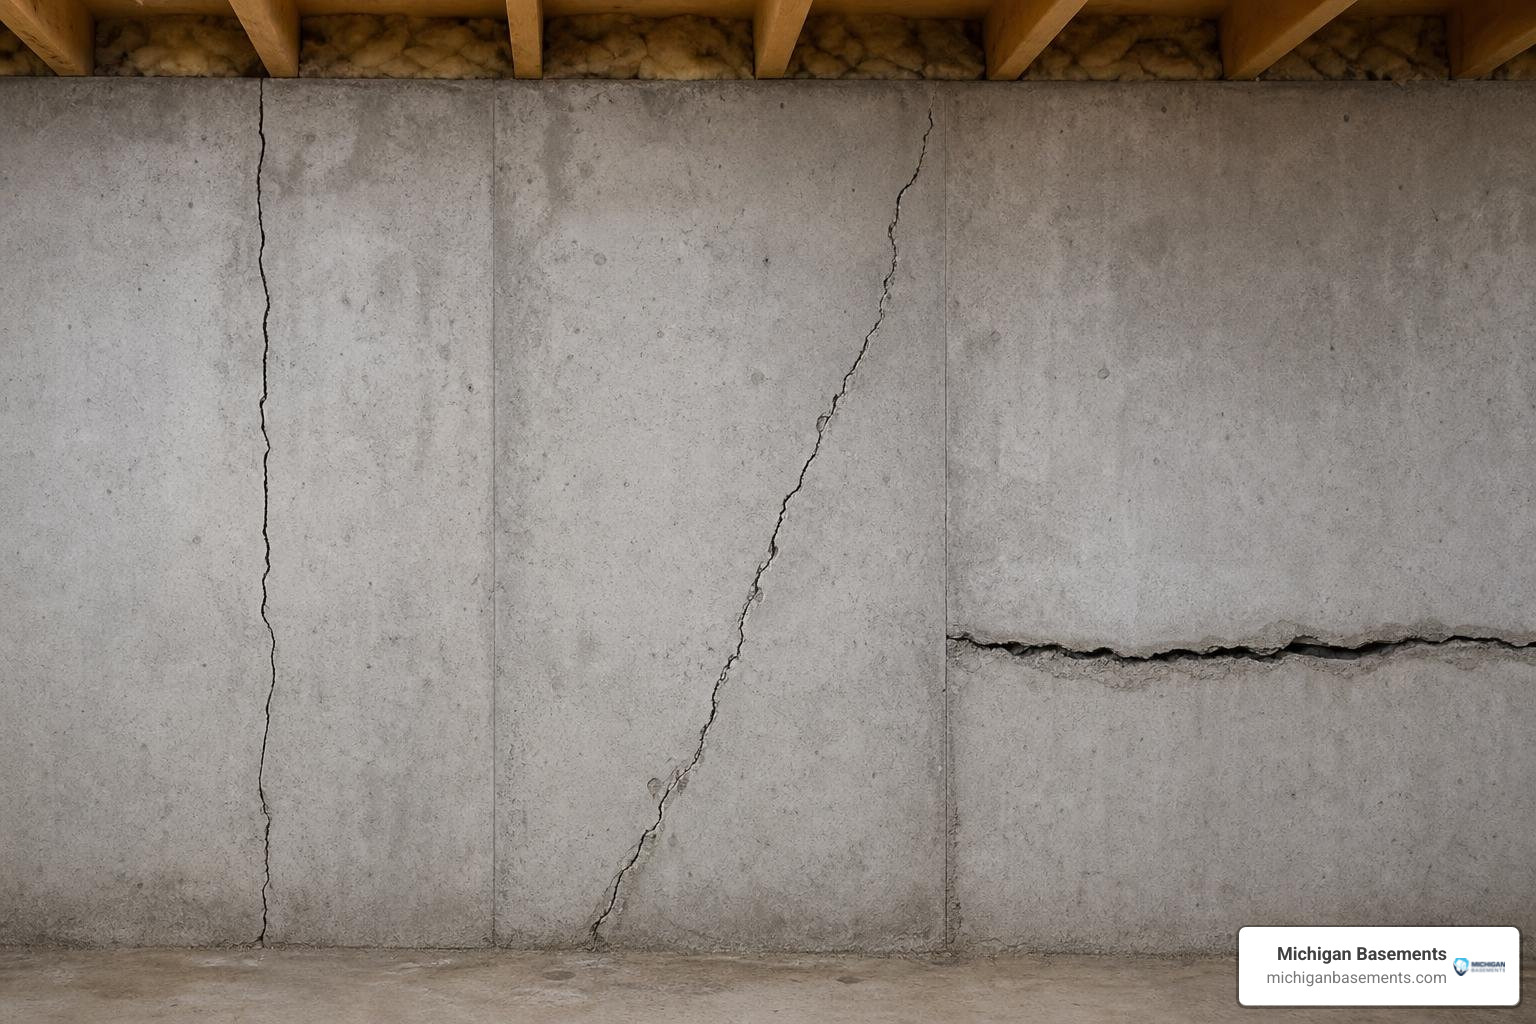
In Oakland County, Macomb County, and Wayne County, our local geology plays a massive role in foundation movement. The region features clay-heavy soils that act like a sponge. When it rains, the clay expands, exerting thousands of pounds of lateral pressure against your foundation. When dry seasons arrive, the soil shrinks, leaving voids that cause the foundation to settle. This continuous cycle, combined with harsh Michigan winters (freeze-thaw cycles), is the primary engine behind foundation damage.
For a detailed look at the physical mechanics behind this process, read our guide on How Did the Cracks in My Basement Walls Form?.
Identifying Non-Structural and Hairline Cracks
Not every crack in your basement means your house is sliding into a sinkhole. In fact, most cracks are entirely non-structural.
The American Concrete Institute (specifically in report ACI 224R) notes that crack widths up to 0.016 inches are completely reasonable and expected for dry exposure conditions. These are commonly referred to as hairline cracks (typically under 1/16 of an inch wide).
- Curing Shrinkage: When a home is built, the poured concrete foundation contains a large amount of water. As the concrete dries and cures over its first year, it shrinks slightly. This shrinkage inevitably causes minor, hairline vertical cracks.
- Minor Settling: As the weight of the home fully rests on the soil, minor vertical or slightly diagonal cracks may appear near the center of the wall or near basement windows.
If these cracks are dry, stable, and thin, they are cosmetic. However, because concrete is porous, even small cracks can allow water vapor, insects, or soil gases like radon to seep into your home. If you notice a minor crack, we recommend marking both ends with a pencil, noting the date, and checking it every month. If it doesn’t widen over 3 to 6 months, you can safely seal it or leave it alone.
If you have discovered a crack and aren’t sure of its severity, check out our diagnostic checklist: What to Do If You Have a Cracked Basement Wall.
Red Flags: When Repairing Basement Wall Cracks Requires Professional Help
While vertical hairline cracks are usually harmless, other crack patterns are clear warnings of structural distress. If you observe any of the following “red flags,” do not attempt a DIY fix:
- Horizontal Cracks: A horizontal crack running along the middle third of a concrete or block wall is a major structural emergency. This is caused by intense lateral soil pressure pushing the wall inward.
- Stair-Step Cracks: In concrete block walls, cracks that follow the mortar joints in a stair-step pattern indicate differential settling or severe lateral pressure.
- Bowing or Bulging Walls: If you place a level or straightedge against the wall and notice it is leaning or bowing inward, the wall is failing structurally.
- Shearing: This occurs when the top of the foundation wall slides inward over the bottom portion, or when a crack is “offset” (meaning one side of the crack sticks out further than the other).
If you suspect structural movement, hiring an independent licensed structural engineer is highly recommended. For a fee of $300 to $800, an engineer will provide an unbiased assessment and a written plan for repair, ensuring you don’t pay for unnecessary work.
For a complete breakdown of structural horizontal failures, read our A Homeowner Guide on How to Fix a Horizontal Crack in Basement Wall.
Poured Concrete vs. Concrete Block Walls
The construction material of your foundation dictates how it cracks and how it must be repaired.
Poured Concrete Walls
These are solid monoliths of concrete. Cracks in poured walls typically run vertically or diagonally. Because the wall is solid, a crack goes straight through from the inside to the outside. This makes them perfect candidates for pressurized injection repairs (using epoxy or polyurethane), which fill the entire thickness of the wall.
Concrete Block (CMU) Walls
Concrete block walls are built from hollow masonry units held together by mortar. They do not behave like poured concrete. When lateral pressure strikes a block wall, the cracks almost always follow the weaker mortar joints, resulting in stair-step cracks.
Because concrete blocks are hollow, water doesn’t just pass through a single crack; it fills the hollow cores of the blocks. Standard pressurized injection does not work on hollow blocks because the liquid injection material simply drains into the hollow cavities instead of sealing the crack.
To learn more about the unique behavior of block foundations, read our resource on How to Fix a Cracked Basement Wall.
Step-by-Step Guide to Repairing Basement Wall Cracks Yourself
If you have diagnosed your crack as a non-structural vertical or diagonal crack in a poured concrete wall, you can successfully repair it yourself.
For a quick reference, check out our step-by-step overview: How to Fix Foundation Cracks in 5 Simple Steps.
Safety First
Before starting, equip yourself with:
- Safety goggles
- Heavy-duty latex or nitrile gloves (epoxy and polyurethane are incredibly difficult to remove from bare skin)
- A dust mask
Preparation Tools
- A wire brush or drill attachment
- A cold chisel and hammer
- A plastic putty knife
- A blow dryer or heat gun
Epoxy vs. Polyurethane Injection: The Decision Matrix
Choosing the right material is the single most important step in a successful DIY repair.
| Feature | Epoxy Injection | Polyurethane Injection |
|---|---|---|
| Primary Purpose | Restores structural strength | Stops water leaks permanently |
| Tensile Strength | 3,000 to 10,000 PSI (stronger than concrete) | 200 to 400 PSI |
| Flexibility | Rigid (will crack if wall moves again) | Highly flexible (withstands minor movement) |
| Moisture Compatibility | Must be completely dry | Can be applied to wet or actively leaking cracks |
| Expansion | Does not expand | Expands up to 20x its liquid volume |
| Hollow Block Use | No | No (unless using a foam backer rod) |
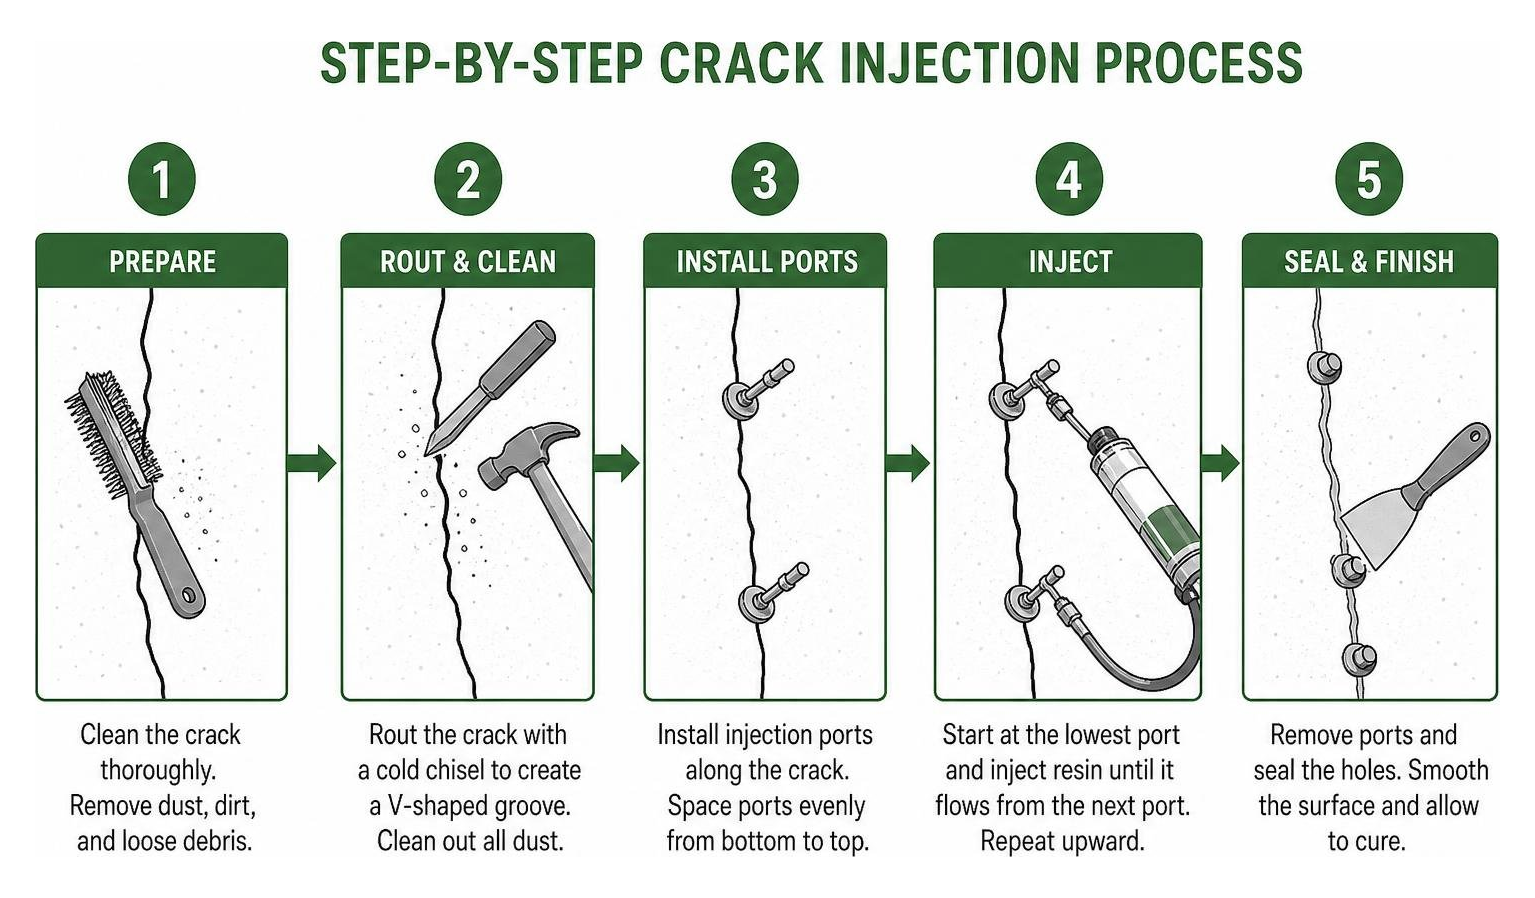
Preparing the Crack for Repair
A repair is only as good as the surface preparation. If you skip these steps, your injection ports will pop off, and your sealant will peel away.
- Clean the Wall: Use a stiff wire brush (or a wire wheel attachment on an electric drill) to scrub the crack and the concrete surface at least two inches on either side. Remove all paint, efflorescence (white powdery salt deposits), loose concrete, and dirt.
- Blow Out the Dust: Use compressed air or a vacuum to blow all remaining dust out of the crack.
- Chisel Only When Necessary: For injection kits, do not chisel a V-groove into the crack. A V-groove actually reduces the surface area for the surface-sealing paste to bond. However, if you are using hydraulic cement to plug an active leak, you must chisel the crack into a U-shape (at least 3/4-inch wide and deep) to mechanically lock the cement in place.
- Perform the Blow Dryer Test: If you plan to use epoxy, the concrete must be bone dry. Run a blow dryer or heat gun along the crack for 10 minutes, then wait 30 minutes. If moisture returns or the concrete darkens, water is actively seeping through, and you must use polyurethane instead of epoxy.
For more details on prepping your concrete foundation, see How to Fix a Foundation Crack.
Polyurethane vs. Epoxy Injection Methods
Once your crack is prepped, you are ready to install the injection ports and apply the material. DIY kits for both methods typically cost between $40 and $150.
Step 1: Install the Injection Ports
Space your plastic injection ports along the crack. The general rule is to place a port every 12 inches (or equal to the thickness of your foundation wall). Start 3 inches from the bottom floor.
Step 2: Apply the Surface Seal
Mix the two-part epoxy paste or surface sealant provided in your kit. Apply a generous amount to the back of each port flange, being careful not to plug the center hole, and press them firmly over the crack. Next, use a putty knife to spread the remaining paste over the entire length of the crack between the ports, creating a 1/4-inch-thick ribbon. This prevents the liquid injection material from leaking out of the front of the wall. Let this surface seal cure completely (usually 1 to 12 hours depending on the kit).
Step 3: Inject the Material
- For Polyurethane: Start at the lowest port. Attach the mixing nozzle of your polyurethane cartridge to the port and slowly squeeze the trigger. Polyurethane is hydroactive; it will react with the moisture inside the crack and begin to foam and expand up to 20 times its volume. Continue injecting until you see the liquid start to seep out of the port directly above it. Cap the current port and move up to the next one. Repeat this process until you reach the top of the crack.
- For Epoxy: The process is similar, but because epoxy does not expand, you must inject slowly to allow the low-viscosity liquid to completely fill the crack from back to front.
For an in-depth review of the best products on the market, read our guide on the Top Liquid Cement and Concrete Crack Fillers That Actually Work.
Applying Hydraulic Cement for Active Leaks
If you have water actively gushing or heavily weeping through a crack during a heavy storm, an injection kit won’t work because the water will wash away the uncured surface seal. In this emergency scenario, hydraulic cement is your best tool.
Hydraulic cement contains specialized additives that cause it to expand rapidly as it cures, setting completely in 3 to 5 minutes—even while entirely submerged in water.
- Chisel a U-Shape: Use a cold chisel and hammer to undercut the crack. Make it at least 3/4-inch deep and wide. Ensure the back of the groove is slightly wider than the front (creating a dovetail shape) to lock the cement in.
- Mix Small Batches: Only mix as much hydraulic cement as you can apply with your hands in 3 minutes. It hardens incredibly fast.
- Force It In: Shape the mixed cement into a wedge. Wait until it starts to feel warm in your gloved hand, then press it firmly into the chiseled groove. Hold it in place with steady, heavy pressure for at least 3 full minutes.
- Keep It Damp: To prevent the patch from shrinking or cracking as it cures, keep the surface damp by misting it with water for the first hour.
The Catch: While hydraulic cement is an excellent emergency plug, it is not a permanent structural fix. It only penetrates a fraction of an inch into the wall. Over time, the continuous hydrostatic pressure from the outside will push against this rigid plug, eventually causing it to pop loose or leak around the edges.
Professional Foundation Repair: Methods, Costs, and Drainage Solutions
While a DIY injection kit is perfect for minor vertical cracks, serious structural damage or widespread basement moisture requires professional remediation. At Michigan Basements, we look at your foundation as an entire system. Simply sealing a crack from the inside without addressing why the crack formed is like patching a tire without removing the nail.
How Much Does Repairing Basement Wall Cracks Cost Professionally?
When you hire a professional foundation repair specialist, the cost depends heavily on the severity of the damage and the method required to stabilize your home.
- Professional Crack Injection: For a straightforward vertical crack, professional epoxy or polyurethane injection runs $300 to $800 per crack.
- Carbon Fiber Straps: If a poured or block wall is bowing slightly, carbon fiber straps are an incredibly strong, low-profile solution. They cost $350 to $1,000 per strap. A typical bowing wall requires 4 to 6 straps, bringing the total to $1,400 to $6,000.
- Wall Anchors: For more severe bowing, heavy-duty steel plates are anchored into the stable soil outside your yard and connected to the basement wall via steel rods. These cost $500 to $1,000 per anchor (typically $1,500 to $5,000 total per wall).
- Steel I-Beams: If anchors cannot be placed outside due to property lines or decks, steel I-beams are installed vertically along the inside of the wall to prevent further bowing. This costs $4,000 to $12,000 total.
- Helical Piers: If your foundation is actively sinking (differential settlement), heavy steel piers must be driven deep into the earth until they reach load-bearing soil to lift and stabilize the home. This costs $2,000 to $4,000 per pier, with total projects running $12,000 to $48,000+.
For a detailed breakdown of these costs, see our resource: How Much Does It Cost to Waterproof a Basement?. For broader industry context on these structural repair systems, you can also refer to this comprehensive Foundation Crack Repair: When It’s Serious & What It Costs.
Why Sealing from the Inside Isn’t Always Enough
If your basement is experiencing widespread seepage where the wall meets the floor (the cove joint), sealing individual wall cracks will not solve the problem. Water is highly persistent; if you block its path at one crack, the hydrostatic pressure will simply force it through another weak point in your foundation.
To permanently fix a wet basement, you must manage the water before it reaches your walls:
- Maintain Proper Exterior Grading: Ensure the soil around your home slopes away from the foundation at least 6 inches over the first 10 feet.
- Extend Downspouts: Clean your gutters regularly and extend downspout discharges at least 6 to 10 feet away from your foundation.
- Install an Interior Drainage System: This involves cutting a channel around the perimeter of your basement floor, installing a perforated drain tile, and routing the water to a reliable sump pump system. This relieves hydrostatic pressure under and around your home.
To understand how to control water flow around your foundation, read our article on Foundation Crack Water Control: Stop the Seep and Save Your Basement. For homeowners considering a full-scale exterior excavation, read our step-by-step guide on How to Waterproof a Basement from the Outside.
Frequently Asked Questions
Does hydraulic cement permanently fix a leaking basement wall?
Answer: No, hydraulic cement does not permanently fix a leaking basement wall. It acts only as a temporary surface plug. Because hydraulic cement does not penetrate the full depth of the concrete wall and lacks flexibility, the natural expansion and contraction of your foundation will eventually cause the rigid cement patch to crack and leak again. For a permanent fix, a flexible polyurethane injection or a professional dual-protection drainage system is required. Learn more about permanent sealing methods by reading about NY-based solutions like the FlexiSpan system in this guide on Basement Wall Crack Repair In Poughkeepsie, Middletown, Newburgh | Leaking Wall Cracks in NY.
Can I use Flex Seal to repair a basement wall crack?
Answer: No, you cannot use Flex Seal to repair a basement wall crack. Flex Seal is a thin surface coating that cannot withstand the high hydrostatic water pressure pressing against your foundation walls. While it might stop a damp spot temporarily, the water pressure will eventually blister and peel the coating away. To understand why topical coatings fail, read Slapping on a Band-Aid: The Truth About Flex Seal for Foundation Leaks.
What is the difference between epoxy and polyurethane injection?
Answer: The primary difference is that epoxy injection is designed to restore structural strength, while polyurethane injection is designed for waterproofing. Epoxy cures into a rigid, rock-hard material with a tensile strength of 3,000 to 10,000 PSI, making it ideal for dry, structural cracks. Polyurethane is a hydroactive foam that expands up to 20 times its volume to fill every void in the crack, remaining highly flexible to accommodate minor seasonal foundation movement. For a deep dive into active leak repair, read this guide on How to Fix a Leaking Basement Wall: 3 Proven Methods.
Conclusion
Repairing basement wall cracks doesn’t have to be a source of constant anxiety. By properly identifying the type of crack, monitoring it for movement, and selecting the correct repair material—whether a DIY polyurethane injection kit for a minor leak or a professional stabilization system for a bowing wall—you can protect your home’s structural integrity and keep your basement dry.
Michigan Basements is the leading provider of professional basement waterproofing, foundation repair, wall stabilization, and crawl space encapsulation in Southeast Michigan. Serving homeowners across Metro Detroit, Oakland County, Macomb County, and Wayne County, our family-owned business is built on clean workmanship, customer involvement, and providing honest, no-cost inspections. We don’t believe in high-pressure sales tactics; we believe in finding the right, permanent solution for your home.
Ready to get a professional, honest assessment of your basement cracks? Contact Michigan Basements today to schedule your no-cost inspection and gain permanent peace of mind, or read more info about wall stabilization services.
 Get instant pricing!