


Resources
Internal vs External: The Ultimate Guide to Tanking Basement Walls

Internal vs External: The Ultimate Guide to Tanking Basement Walls
How to Tank Basement Walls and Choose the Right System
Tanking basement walls means creating a continuous waterproof barrier across the below-grade walls, floor, and wall-floor joint. To do it correctly, professional contractors first identify the water source and repair structural defects. The crew then strips the surface to sound masonry or concrete, seals cracks and penetrations, forms a reinforced fillet at the wall-floor junction, and applies the specified waterproofing system without gaps.
The right approach depends on the pressure and condition around your foundation:
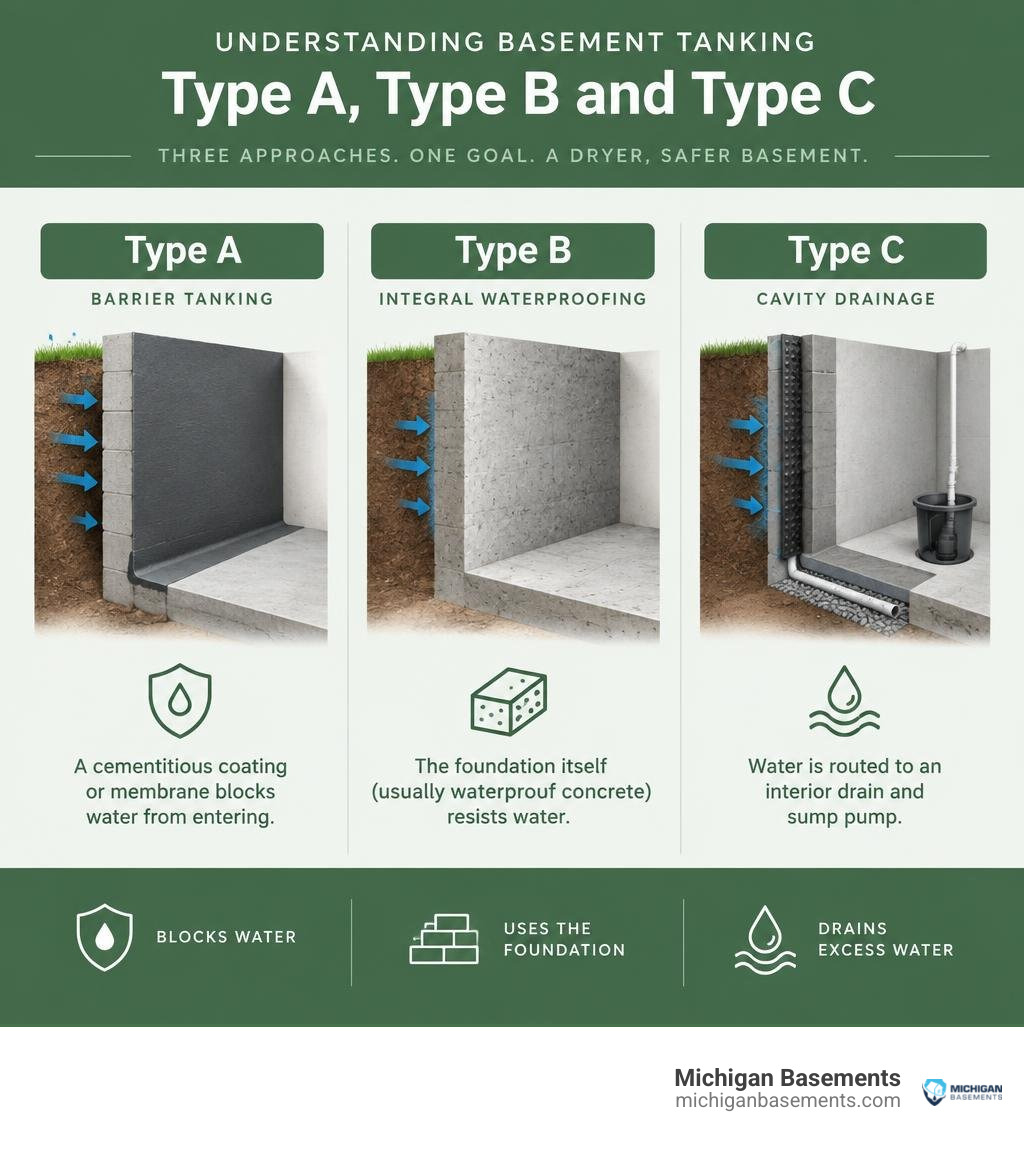
- Type A tanking uses a cementitious coating or membrane to block water.
- Type B waterproofing relies on the foundation itself, usually waterproof concrete, to resist water.
- Type C cavity drainage accepts that water may reach the wall, then routes it to an interior drain and sump pump.
For many Southeast Michigan homes, water-saturated soil creates heavy hydrostatic pressure against basement walls. A coating alone will not fix bowing walls, major cracks, poor grading, or failed exterior drainage. In higher-risk situations, a combined barrier and drainage system is often the more dependable choice.
Michigan Basements provides professional basement waterproofing, foundation repair, and wet-basement diagnosis throughout Southeast Michigan. I am Dominic Hesano, and I have seen how proper preparation, drainage, and structural repairs determine total basement tanking costs and whether tanking basement walls lasts or fails.
Understanding Basement Tanking: Type A, Type B, and Type C Systems
When property owners research basement waterproofing, they frequently encounter three distinct classifications defined under British Standard BS 8102:2022 (Code of practice for protection of below ground structures against water ingress). These international engineering standards provide a reliable framework for categorizing how below-grade structures handle subterranean water pressure.
- Type A (Barrier Protection): Commonly known as tanking, this method applies an impermeable barrier coating or sheet membrane directly onto the interior (negative side) or exterior (positive side) of the foundation walls and floor slab. Type A relies 100% on its chemical and physical bond with the masonry to resist lateral ground moisture and hydrostatic pressure.
- Type B (Structurally Integral Protection): This approach relies on the structure itself to resist water penetration. It requires specially engineered, water-resistant reinforced concrete designs, water bars in construction joints, and additive-enhanced concrete mixes poured during initial construction.
- Type C (Drained Protection): Instead of attempting to completely block water pressure at the face of the masonry, Type C uses an internal cavity drainage membrane (a studded HDPE dimple sheet) fixed to the walls and floor. Water that penetrates the wall trickles harmlessly behind the membrane into concealed perimeter drainage channels, flowing directly to a modern sump pump system for controlled discharge.
| System Type | Mechanism | Hydrostatic Pressure Handling | Typical Applications |
|---|---|---|---|
| Type A (Barrier Tanking) | Continuous impermeable coating or membrane | Holds back active pressure purely via physical bond | Interior retrofits, exterior positive-side coatings |
| Type B (Integral) | Water-resistant concrete mix and waterstops | Resists water through structural density and thickness | New construction foundation pours |
| Type C (Cavity Drainage) | Studded membrane, interior channels, sump pump | Relieves pressure by collecting and discharging water | High water table areas, finished basements |
Structural Waterproofing vs Breathable Lime Systems for Historic Walls
In older residential architecture across Metro Detroit—such as early 20th-century homes in Detroit, Birmingham, or Ann Arbor—foundations were often built with clay brick, fieldstone, or soft lime mortars rather than modern poured concrete. Applying a rigid, modern cementitious tanking slurry to these soft substrates can trap subsurface moisture and migration salts behind an unyielding barrier, accelerating internal spalling and joint decay.
For these historic structures, breathable, pozzolanic Roman lime mortars (such as Rinzaffo MGN formulations) offer an alternative. These traditional lime systems can withstand up to 7.5 N/cm² of force (equivalent to roughly 75 atmospheres of lateral water pressure) while remaining vapour-permeable. This allows the masonry to release trapped moisture naturally without blowing off the coating. For standard concrete masonry units (CMUs) or poured foundations, modern polymer-modified cement slurries and proper foundation waterproofing coatings remain the industry standard.
Step-by-Step Guide to Tanking Basement Walls from the Inside

Internal barrier tanking (negative-side waterproofing) is a multi-step structural process. It demands rigorous substrate preparation, as any dust, oil, old paint, or loose mortar will cause the waterproof coating to delaminate under hydrostatic pressure. For Southeast Michigan homeowners, this work requires specialized surface preparation, controlled mixing, and correct curing conditions to perform reliably against Michigan’s seasonal groundwater cycles.
Surface Preparation and Creating Wall-Floor Fillet Joints
A qualified waterproofing contractor will follow these professional installation standards before applying any barrier system:
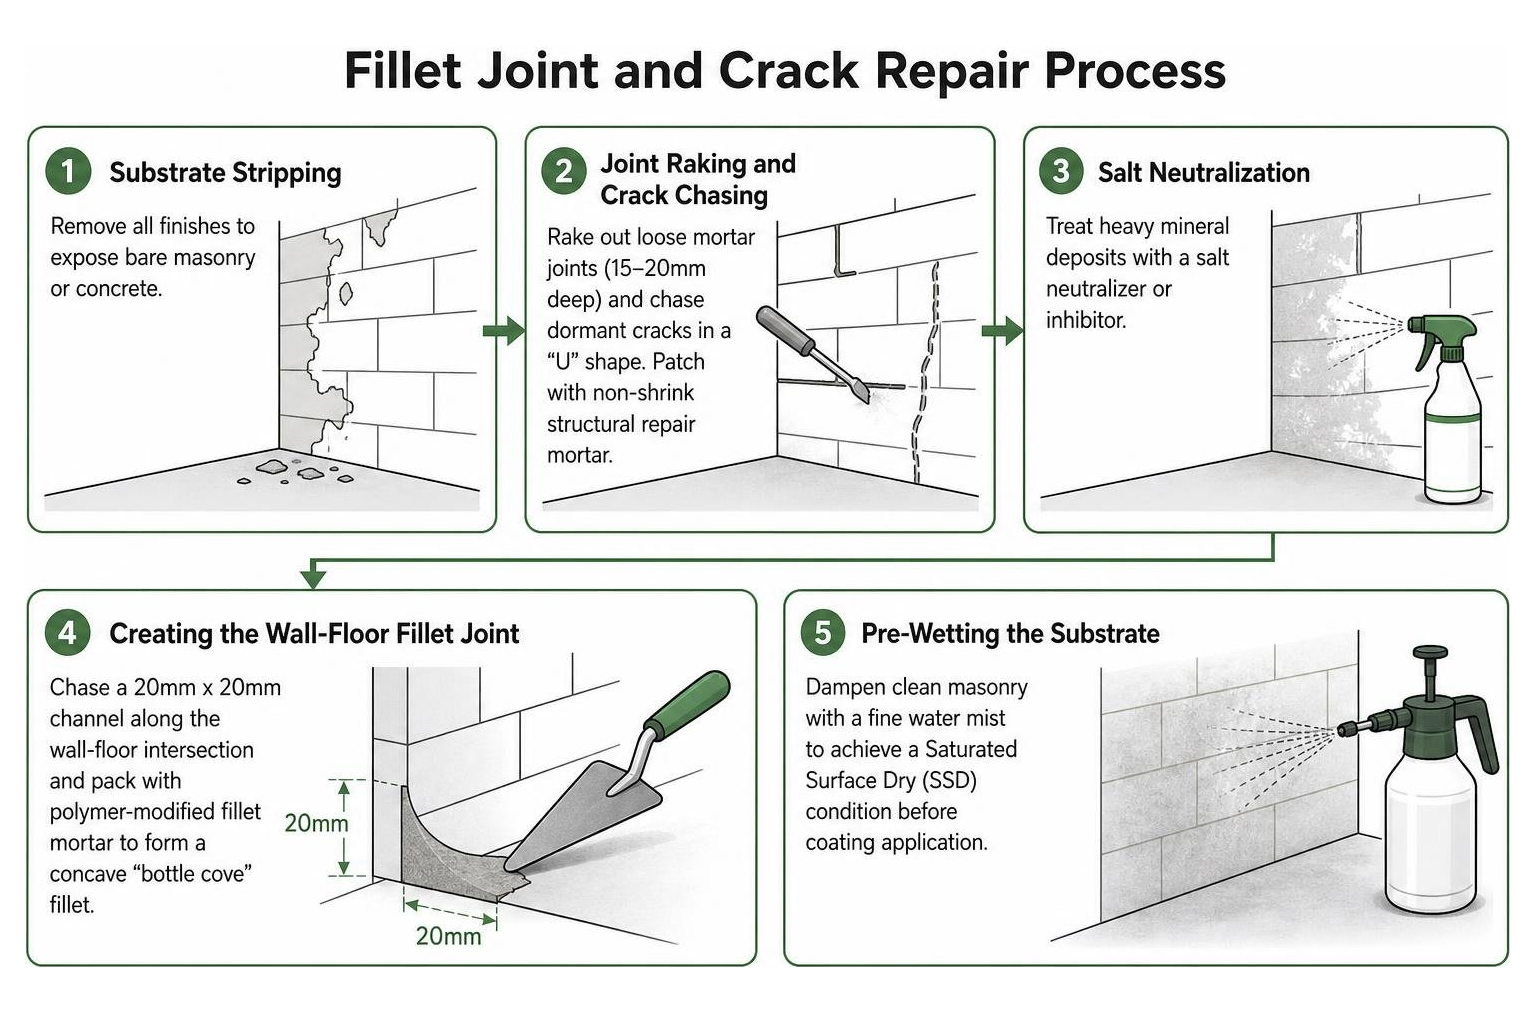
- Substrate Stripping: Remove all existing gypsum plaster, drywall, paint, efflorescence (mineral salts), and loose coatings down to sound, bare masonry or poured concrete.
- Joint Raking and Crack Chasing: Rake out crumbling mortar joints to a depth of roughly 15mm to 20mm. Mechanically chase out all dormant shrinkage cracks in a “U” shape before patching and repairing leaking concrete walls using a non-shrink structural repair mortar.
- Salt Neutralization: Treat masonry exhibiting heavy mineral deposits with a specialized salt neutralizer or inhibitor to stop crystal growth from compromising the bond.
- Creating the Wall-Floor Fillet Joint: The 90-degree intersection where the basement wall meets the floor slab is the most vulnerable weak point in any foundation. A professional crew chases a 20mm x 20mm channel along the perimeter joint and packs it with a polymer-modified fillet mortar (such as PermaSEAL Fillet Seal) to form a concave “bottle cove” fillet. This redistributes lateral water stress away from the sharp corner.
- Pre-Wetting the Substrate: Dampen the clean masonry with a fine water mist before coating application to achieve a Saturated Surface Dry (SSD) condition. This prevents dry masonry from rapidly pulling mixing water out of the slurry.
Application Methods for Tanking Basement Walls
Applying a continuous cementitious barrier requires precise environmental and mechanical controls to ensure long-term bonding. Professional installers follow these standards:
- Mechanical Mixing: Mix the cementitious slurry powder with clean water using a high-torque paddle mixer at low speed (under 500 RPM) for three continuous minutes. Allow the mixture to rest for one minute, then remix briefly before application to ensure uniform polymer activation.
- First Coat (Horizontal): Apply the first coat generously across the pre-wetted wall using a stiff masonry brush or specialist hopper gun at a thickness of approximately 1.0mm to 1.5mm. Work the slurry horizontally into every crevice, pore, and mortar joint.
- Second Coat (Vertical): Once the first coat has hardened sufficiently so it cannot be scratched by a fingernail (typically 2 to 24 hours later), apply a second coat at right angles (vertically). Applying coats perpendicularly prevents pinholes and micro-voids. Using contrasting colors (such as grey for coat one and white for coat two) provides a visual check for complete coverage.
- Curing and “Sweating”: Allow the system to cure for 24 to 48 hours. During this period, the wall may show light surface condensation—often referred to as “sweating.” This is a normal hydration byproduct and should not be mistaken for water ingress. Proper mechanical ventilation prevents excessive relative humidity during curing, ensuring long-term protection when sealing concrete and masonry basement walls.
Exterior Basement Tanking and Hydrostatic Pressure Management

Exterior waterproofing (positive-side tanking) stops water before it ever contacts the foundation wall. It is the most robust way to protect structural concrete from freeze-thaw degradation, but it requires substantial site work.
- Excavation to the Footing: Excavate a trench around the foundation perimeter down to the top of the concrete footing, typically 7 to 9 feet below grade in Michigan residential homes.
- Wall Preparation: Power-wash the exposed concrete or cinder block, repair structural cracks, and apply a smooth parge coat over rough CMU masonry.
- Primary Membrane Installation: Apply a thick, seamless, elastomeric membrane—such as a polymer-modified liquid membrane, rubberized asphalt emulsion, or peel-and-stick sheet barrier.
- Dimpled Drainage Board: Fasten an impact-resistant, high-density polyethylene (HDPE) dimpled drainage board over the cured membrane. This board serves two vital roles: it protects the membrane from rock punctures during backfill and creates an open drainage plane that funnels water straight down.
- Footing Drain and Free-Draining Backfill: Install a perforated PVC or corrugated footing drain pipe encased in washed crushed aggregate and wrapped in geotextile filter fabric. Backfill the trench with granular soil, compacting in lifts, and establish positive surface grading away from the home.
For detailed external procedures, explore Waterproofing Basement Walls From Outside: The 2026 Guide or our guide on waterproofing basement walls from the outside.
Managing Hydrostatic Pressure with Combined Waterproofing Systems
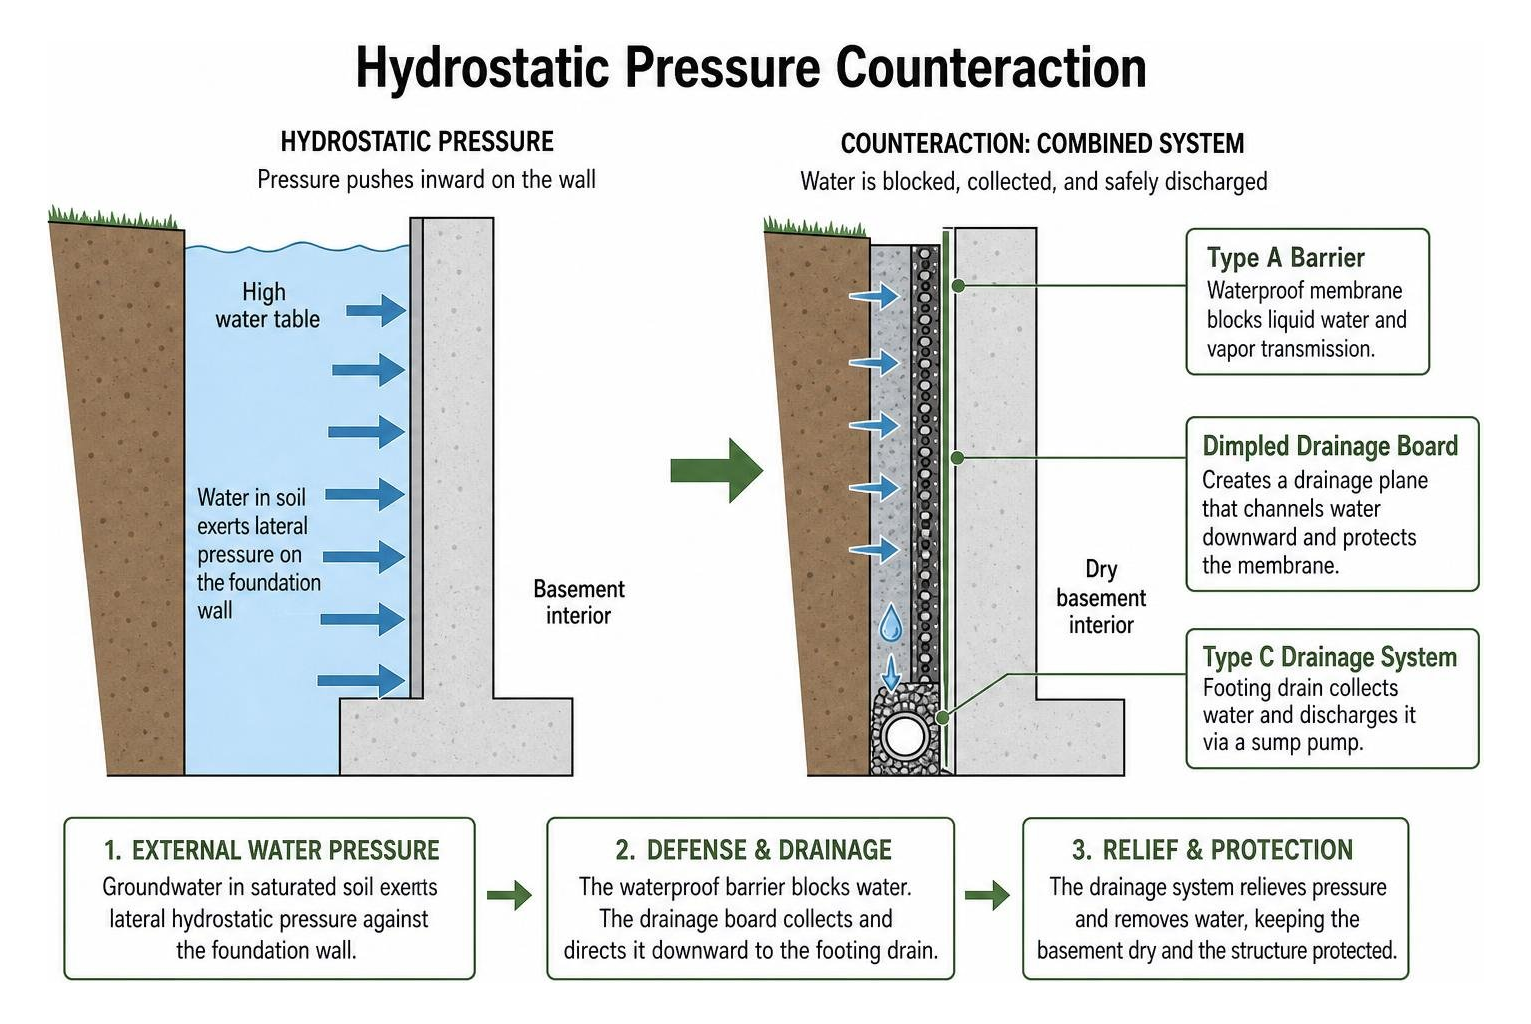
Hydrostatic pressure occurs when groundwater saturates the soil surrounding your home. At a basement depth of 8 feet, waterlogged soil can exert substantial lateral loads against foundation walls—reaching up to 25 kPa (or more than 60 lbs per square foot).
When a high water table surrounds a basement, relying solely on an interior Type A slurry can be risky. Under intense pressure, water will search for any micro-fissure or weak point in the wall. If the masonry deflects even slightly, rigid interior slurries can crack and delaminate.
To achieve maximum reliability under BS 8102:2022 guidelines for habitable spaces, we frequently design combined systems:
- A Type A internal or external barrier to prevent bulk liquid penetration and vapor transmission.
- A Type C internal drainage channel with a dual-battery backup sump pump system to relieve water table spikes and guarantee a dry living environment.
Cost Breakdown and Professional Estimates for Basement Tanking
Accurately budgeting a basement tanking project requires calculating the total foundation surface area (perimeter length multiplied by wall height) and accounting for essential substrate preparation, crack stitching, and joint detailing.
Professional whole-basement tanking and waterproofing projects across Southeast Michigan typically range between $6,000 and $25,000. Final project costs depend on basement square footage, accessibility, masonry condition, and whether an interior drainage system is integrated to handle hydrostatic pressure. For broader industry benchmarks, see Tanking Project Price: Typical Cost, Ranges, and What Affects the Bill 2026 – Current Cost.
Because Michigan’s dense clay soils and deep frost levels create substantial hydrostatic loads, barrier systems require specialized surface preparation and structural evaluation. Understanding the risks of DIY basement waterproofing helps homeowners avoid unbonded coatings, failed fillet joints, and unaddressed foundation settlement.
Key Factors Influencing Tanking and Waterproofing Costs
- Substrate Condition and Preparation: Removing old coatings, efflorescence, and failing mortar adds labor but is essential for long-term bonding.
- Wall-Floor Joint Fillet Installation: Detailing the perimeter cove with specialized polymer-modified mortars prevents water entry at the foundation’s most vulnerable cold joint.
- Foundation Dimensions: A standard 800 sq ft wall area (such as a 20 ft by 30 ft basement with 8 ft walls) requires multiple coats of specialized slurry applied at specific mil thicknesses.
- Drainage Integration: Combining interior barrier tanking with sump pump systems and perimeter channels provides comprehensive protection against high water tables.
To get a clear estimate tailored to your home’s layout, use our online pricing tool to review options before scheduling an on-site inspection.
Finishing, Longevity, and Avoiding Common Tanking Failures
A professionally applied, BS 8102-compliant cementitious tanking system typically delivers a service life of 10 to 20 years or more. However, longevity depends entirely on how the cured barrier is finished and protected.
Why Tanking Systems Fail
- Structural Movement: Rigid cementitious slurries cannot accommodate foundation shifting or seasonal settlement. If an unreinforced wall bows under lateral soil load, the barrier cracks.
- Substrate Debonding: Applying slurry over paint, residual wallpaper paste, or salt-contaminated brick prevents a deep crystalline mechanical bond, causing the coating to bubble and peel.
- Puncture Damage: Driving mechanical fasteners (screws, wall plugs, framing anchors) directly through a tanked wall breaks the continuous waterproof envelope.
- Trapped Condensation: Applying vinyl wallpapers or impermeable gloss paints over a newly tanked wall traps ambient indoor humidity, creating mold growth behind decorative finishes.
Compatible Finishing Materials
To preserve the integrity of a newly tanked basement, always use breathable finishes:
- Apply an intermediate 10mm sand-cement render coat (incorporating a waterproofing plasticizer) over the cured slurry before applying decorative finishes.
- Use breathable, mineral-based paints (such as silicate or lime-based formulations) that allow moisture vapor to pass freely.
- Install independent, freestanding stud wall framing offset 1 inch from the tanked barrier to run electrical wiring and drywall without puncturing the coating.
Understanding how long basement waterproofing lasts helps property owners plan long-term protection and routine maintenance.
Frequently Asked Questions About Tanking Basement Walls
Can tanking slurry be applied directly onto bare brickwork?
Yes, provided the brickwork is structurally sound, fully cleaned, and free from loose mortar or efflorescence. If the mortar joints are severely recessed, deteriorating, or uneven, apply a 10mm sand-cement scratch render coat first to create a uniform, flat substrate before applying the slurry.
How long does basement tanking last before requiring reapplication?
A properly specified and installed Type A cementitious slurry system lasts 10 to 15 years under standard conditions. If combined with a Type C cavity drainage system to relieve continuous hydrostatic pressure, the waterproofing envelope can endure for the lifetime of the structure with routine sump pump servicing.
What is the difference between basement tanking and cavity drainage systems?
Tanking (Type A) creates a physical barrier that holds back water pressure at the wall surface. A cavity drainage system (Type C) does not hold back pressure; instead, it uses a studded membrane to capture incoming moisture and direct it through interior drainage channels to a sump pump. Type C is generally more maintainable and accommodating of structural movement.
Conclusion
Tanking basement walls is a proven method for eliminating subsurface dampness and reclaiming below-grade square footage. However, a successful installation requires accurate diagnostic assessment, thorough surface preparation, correctly detailed wall-floor fillet joints, and careful management of lateral hydrostatic pressure.
Every home faces unique soil, water table, and structural dynamics. Michigan Basements specializes in professional basement waterproofing repair, foundation stabilization, crawl space encapsulation, and sump pump installations across Southeast Michigan, including Oakland, Macomb, Wayne, Washtenaw, Livingston, Genesee, and Lapeer counties.
Whether you reside in Bloomfield Hills, Troy, Sterling Heights, Ann Arbor, Rochester, or Detroit, our team provides family-owned expertise, clean workmanship, and no-cost, no-obligation inspections. Use our online pricing tool to explore budget options, or schedule your free estimate with our waterproofing specialists today.
 Get instant pricing!