


Resources
How to Dig a Trench for a French Drain the Easy Way

The Best Way to Dig a French Drain Starts With Grade
The best way to dig a French drain is to plan the outlet first, then excavate a trench that slopes steadily downhill at least 1% – about 1 inch of drop for every 10 feet. For a short, accessible run in workable soil, dig by hand for the best control. For long runs or hard soil, rent a trencher or mini-excavator, but check the trench grade often with a string line and level.
A typical yard drain is 18 to 24 inches deep and about 12 inches wide. Line it with non-woven geotextile fabric, add washed angular gravel, install 4-inch perforated pipe with the holes facing down, then wrap the gravel in fabric before backfilling. Most failures come from a flat trench, dirty gravel, missing fabric, or an outlet that cannot drain downhill.
Call 811 before any digging, and confirm local rules before sending water toward a storm sewer, road, easement, or neighboring property. Foundation drains can be much deeper and may require professional design to avoid disturbing footings.
I am Dominic Hesano of Michigan Basements. After working in wet basements, crawl spaces, and drainage problem yards across Southeast Michigan, I have learned that the best way to dig a French drain is to get the slope, soil conditions, and discharge plan right before the first shovel hits the ground.
Michigan Basements is a Southeast Michigan basement waterproofing, foundation repair, crawl space repair, drain tile, and yard drainage company serving homeowners in communities including Detroit, Troy, Sterling Heights, Bloomfield Hills, and surrounding areas. For homeowners comparing French drains, drain tile systems, and basement waterproofing options, the key decision is whether the problem is surface water, groundwater, or foundation-level hydrostatic pressure.
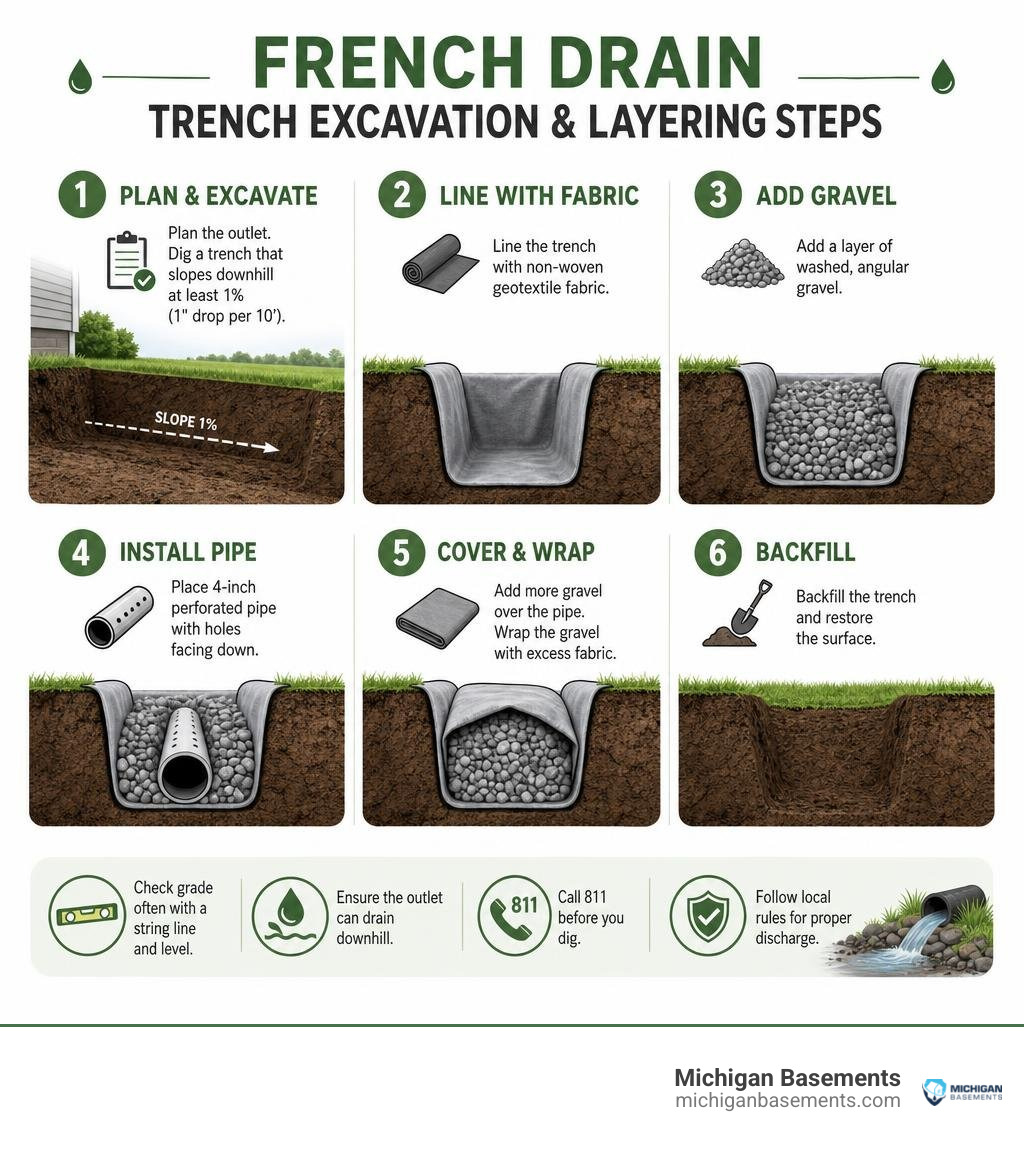
Quick look at best way to dig a french drain:
Planning Location, Depth, and Slope Before Digging
Before breaking ground, planning every dimension of your trench is essential. The most common point of failure for residential drainage is digging without establishing a guaranteed downhill route. Gravity governs every subterranean drainage system, meaning your water collection point must sit noticeably higher than your exit discharge.
Start by contacting 811 to have local utility providers mark buried gas, electrical, water, and communication lines. Digging into an unmarked utility line can lead to severe safety hazards and expensive repair bills. Once clear, map your proposed trench line using marking paint.
Knowing how deep should a french drain be dictates your total excavation effort. Surface water diversion and shallow curtain drains generally require an excavation depth of 18 to 24 inches with a width of 10 to 12 inches. If your goal is intercepting subsurface water near a foundation footing, the trench must reach the base of the footing, often extending 4 to 6 feet deep.
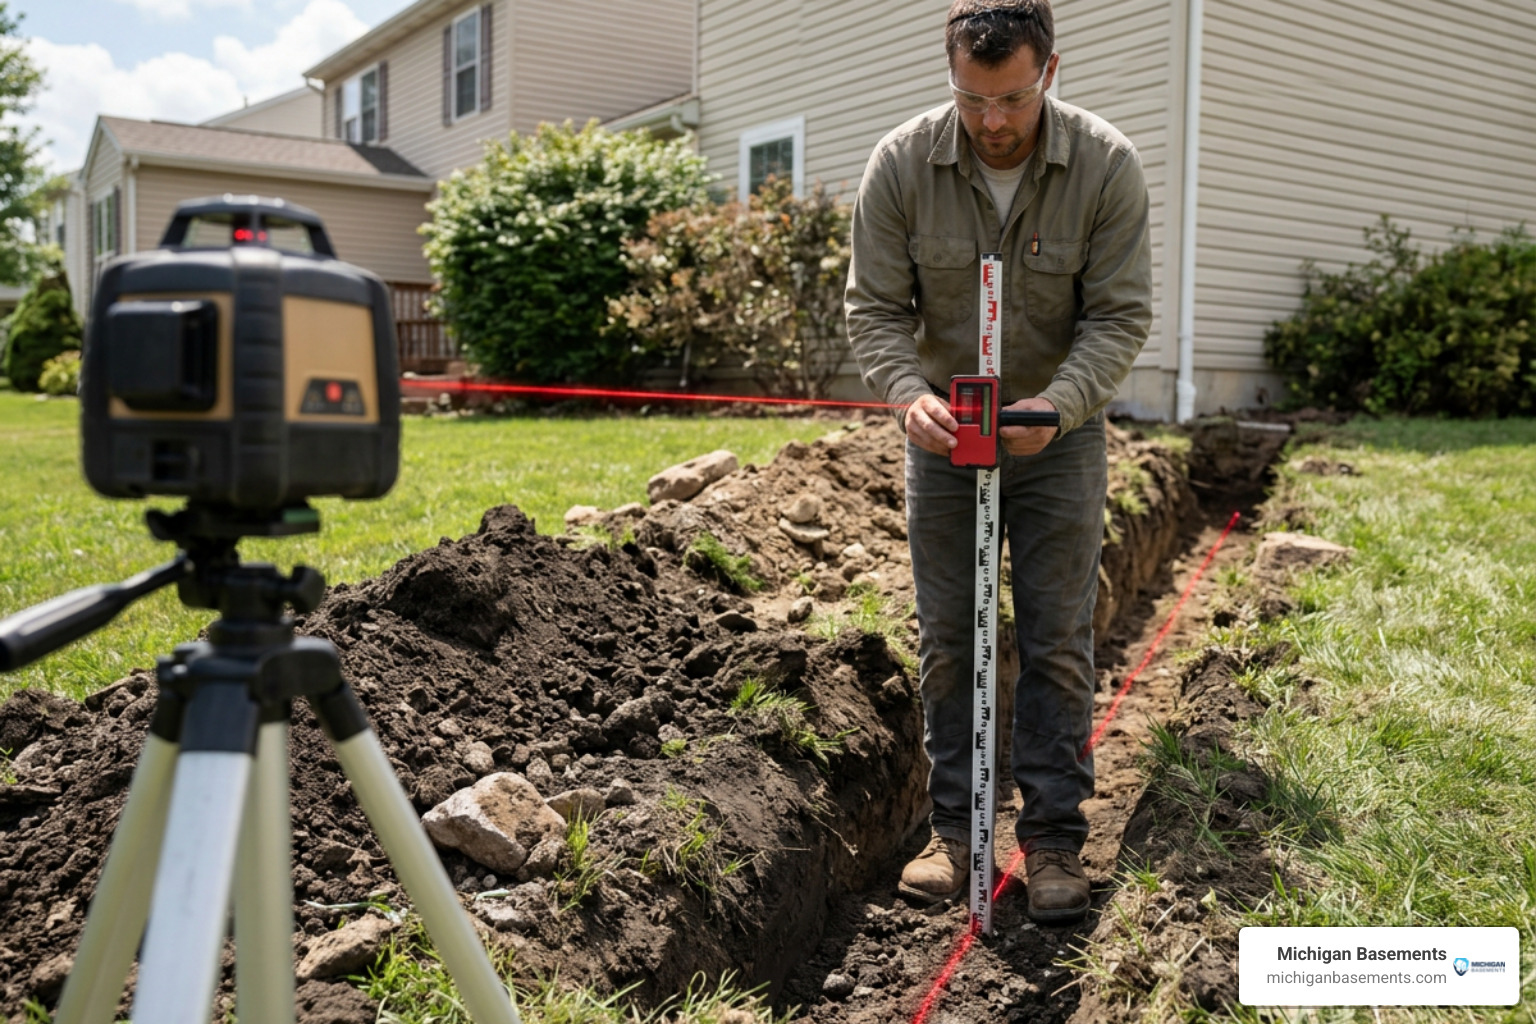
Maintaining gradient requires strict adherence to the 1 percent slope rule. Your trench floor must drop at least 1 inch for every 10 feet of horizontal run (approximately 1/8 inch per foot). To confirm your grade:
- Drive wooden stakes at the start and endpoint of the trench run.
- Tie mason line tightly between both stakes.
- Attach a line level to the string to establish a true horizontal baseline.
- Measure downward from the string to the trench floor at regular 5-foot intervals to verify the slope increases toward your exit point.
For longer runs over 50 feet, a rotary laser level ensures precision grading. Planning the discharge point is just as critical; your drain can daylight out a hillside, connect to an engineered dry well, or empty into a spring-loaded pop-up emitter in the lower yard. Reviewing French drain slope and gravel specifications helps ensure your drop calculations provide sufficient drainage velocity.
Preparing Soil and Route: The Best Way to Dig a French Drain in Clay or Sand
Soil composition dictates how water travels into your trench. In Southeast Michigan communities like Troy, Sterling Heights, and Bloomfield Hills, heavy clay soil is extremely common. Dense clay expands when wet, drains poorly, and easily silts up unshielded aggregate. In contrast, sandy soils allow rapid water infiltration but carry fine particles that can clog perforations if not properly managed.
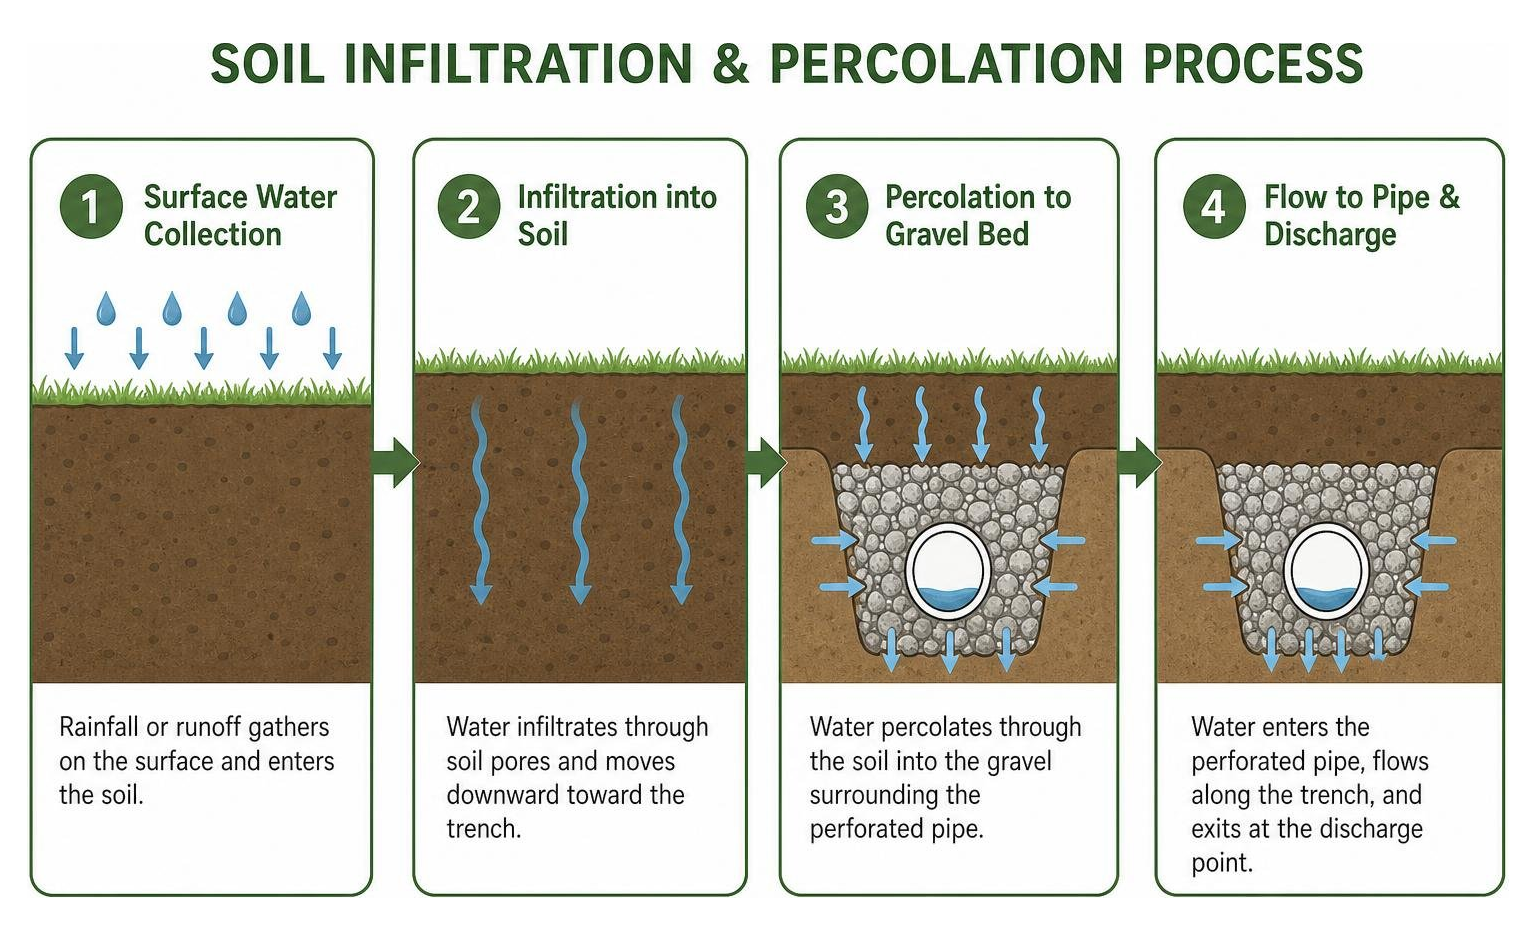
When dealing with heavy runoff, don’t be drained by yard flooding when simple design tweaks can keep water flowing. In dense clay, expand your trench width to 12 or 14 inches and dig 2 to 4 inches deeper. Backfilling around the exterior of your geotextile wrap with coarse sand or sandy loam helps water percolate downward into the gravel bed rather than pooling on hardpan clay above the trench.
Perform a simple percolation test before digging: excavate a 12-inch test hole, fill it with water, and monitor how quickly it recedes. If water sits for hours, increasing your trench pitch to a 2 percent grade ensures collected runoff exits quickly without saturating the surrounding yard.
The Best Way to Dig a French Drain: Hand Digging vs. Trencher vs. Mini-Excavator
Choosing the right excavation method depends on your trench length, soil type, depth requirements, and budget. While a shovel gives you pinpoint control in tight residential landscapes, powered equipment saves substantial physical labor on larger projects.
| Excavation Method | Equipment Rental Cost | Digging Speed | Ideal Run Length | Soil Compatibility & Physical Demand |
|---|---|---|---|---|
| Trenching Shovel & Pickaxe | $0 – $50 (Tool purchase) | 5 – 10 ft/hour | Under 30 feet | Best in loose, moist loam; high physical exertion; zero yard turf damage. |
| Walk-Behind Trencher | $200 – $400 / day | 20 – 40 ft/hour | 30 to 100 feet | Excellent for uniform shallow trenches; struggles in heavy clay, large rocks, and tree roots. |
| Mini-Excavator (12″ Bucket) | $300 – $600 / day | 50+ ft/hour | 100+ feet / Deep Footing | Clears clay, tree roots, and deep trenches easily; requires transport and causes moderate turf disturbance. |
Manual excavation using a sharp trenching shovel and a heavy pickaxe is practical for short runs around flowerbeds or near delicate utilities. Digging by hand allows you to carve clean vertical sidewalls and carefully shape your trench slope. However, manual digging demands significant stamina; excavating a 50-foot trench by hand can take a solo worker 10 to 16 hours.
For mid-range residential runs from 30 to 100 feet, renting a walk-behind mechanical trencher speeds up the excavation process. Trenchers cut clean channels but require careful handling to maintain a steady downhill pitch. In dense ground packed with heavy clay, large river rocks, or thick tree roots, a compact mini-excavator with a 12-inch bucket provides superior power and digging depth. Homeowners assessing their project scope can benefit from evaluating DIY French drain feasibility before deciding whether to dig manually or rent heavy equipment.
Step-by-Step Guide: How to Dig and Install Your Trench the Easy Way
Executing a long-lasting French drain installation requires following an exact sequence of excavation, lining, pipe placement, and backfilling.
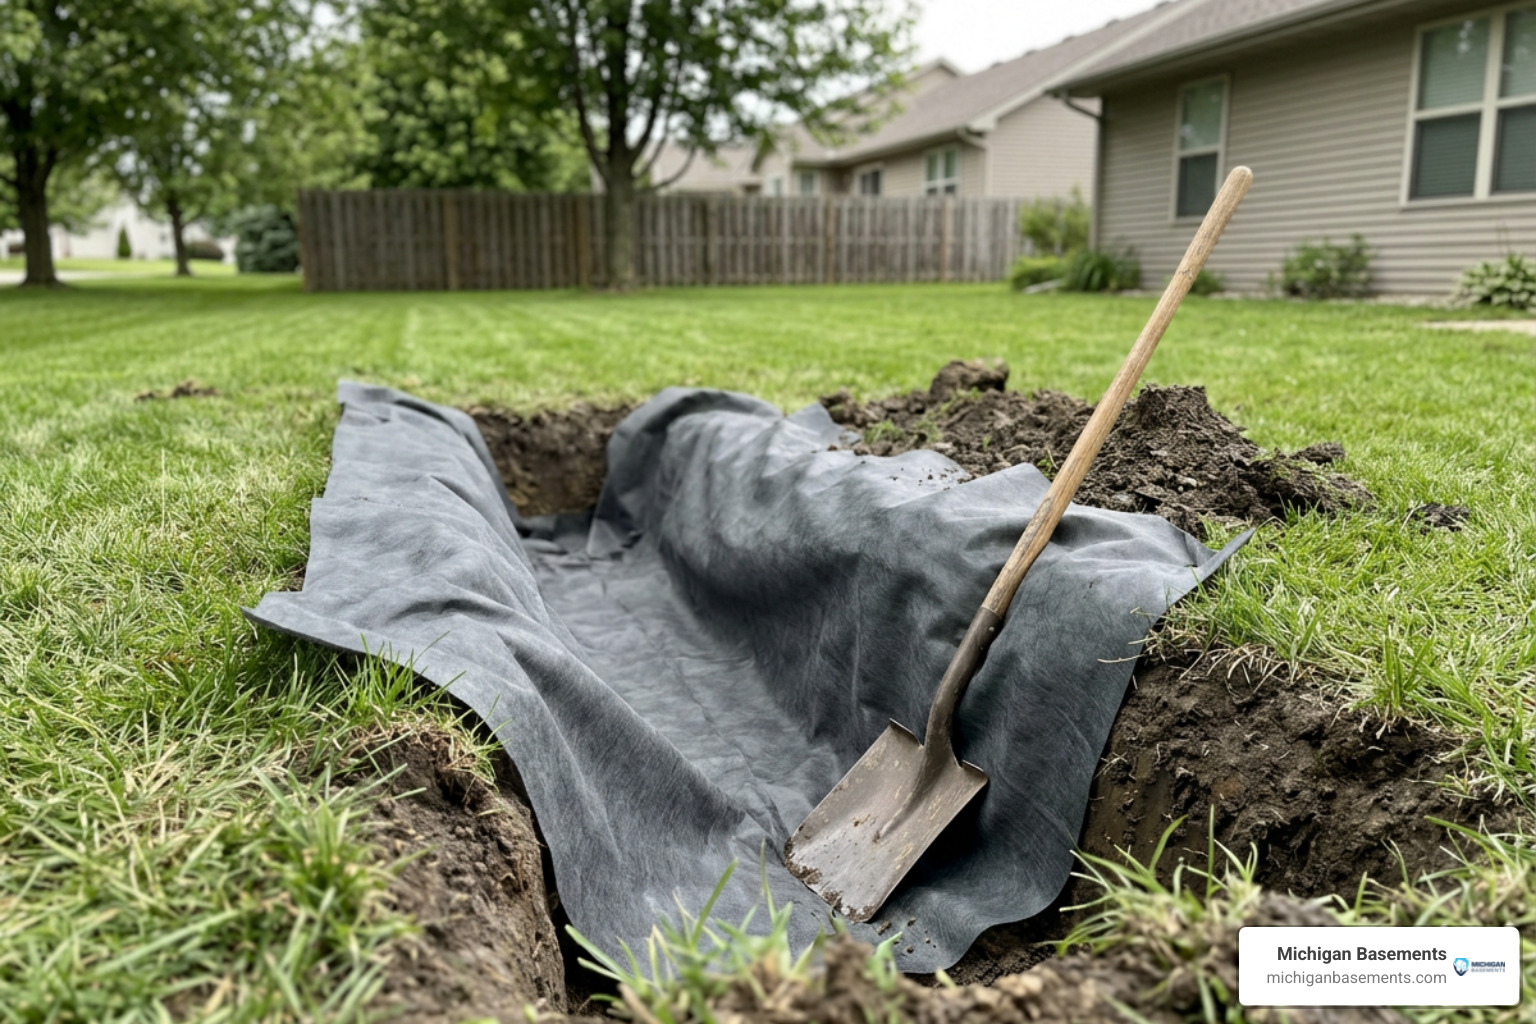
- Turf Removal and Outlining: Lay down two parallel garden hoses or spray marking paint 12 inches apart along the drain route. Use a flat spade to cut cleanly through the sod layer in manageable square sections. Set the cut turf rolls aside on tarps to keep your lawn neat and simplify replanting later.
- Excavate the Main Trench: Dig down to your target depth (typically 18 to 24 inches for yard drainage). Maintain a clean, flat trench bottom that slopes downward continuously toward your chosen discharge point at a 1% minimum grade. Keep excavated dirt on heavy canvas tarps on the opposite side of your sod squares.
- Line the Trench with Geotextile Fabric: Lay non-woven geotextile filter fabric (4 to 6 oz weight) across the bottom and up the sides of the trench. Leave at least 10 to 12 inches of excess fabric draped over both edges of the trench opening. This excess fabric will form the protective outer layer of your burrito wrap assembly.
- Create the Gravel Bedding: Pour 2 to 3 inches of washed, angular crushed stone into the fabric-lined trench floor. Consult the homeowner’s guide to selecting the best gravel for french drains to ensure your aggregate provides sufficient void space. Spread the rock evenly to create a uniform bedding that mirrors your trench slope.
- Install the Perforated Pipe: Lay 4-inch rigid perforated PVC or dual-wall corrugated pipe directly on top of the gravel bed. Check the best pipe for french drain installations explained for detailed durability comparisons. Ensure the perforated holes face downward at the 4 o’clock and 8 o’clock positions. Install vertical cleanout tees every 50 feet and at 90-degree turns to provide easy maintenance access for future water-jet flushing.
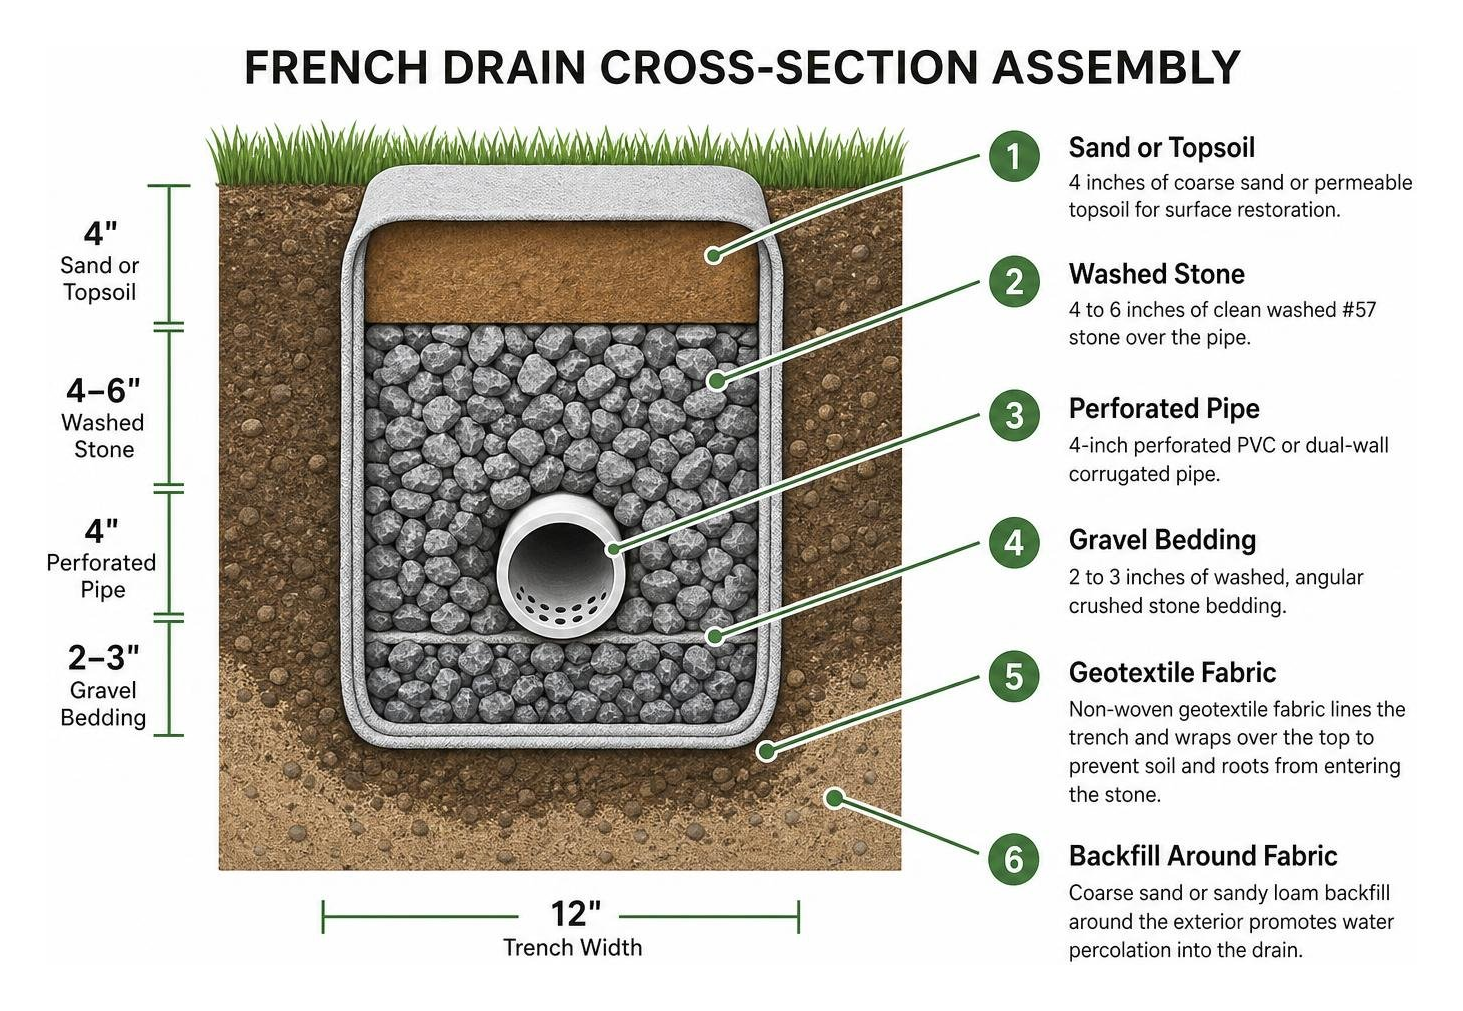
- Backfill with Washed Stone: Cover the pipe with clean washed #57 stone until the gravel layer reaches 4 to 6 inches below the yard surface. For a standard 50-foot trench measuring 12 inches wide and 18 inches deep, you will need approximately 2.6 cubic yards (around 3.7 tons) of stone aggregate.
- Complete the Burrito Wrap: Fold the excess geotextile fabric flaps across the top of the gravel bed, overlapping the edges by at least 6 to 12 inches. This fabric envelope prevents overlying soil and roots from washing down into the rock voids.
- Top Dressing and Surface Restoration: Add 4 inches of coarse sand or permeable topsoil over the wrapped assembly, lightly tamp the surface, and roll your reserved sod sections back into position.
Avoiding Common Trenching and Installation Mistakes
A small installation oversight can cause an entire underground drainage system to back up and fail within a few seasons. Avoid these frequent mistakes:
- Insufficient Trench Slope: Digging a flat trench or creating dips (“bellies”) creates underground pooling where sediment settles, eventually clogging the line.
- Skipping or Misapplying Filter Fabric: Omitting fabric, or using cheap woven weed barrier that easily tears, allows native clay and silt to migrate into gravel voids, reducing drainage capacity rapidly.
- Using Unwashed Pea Gravel or Screenings: Round pea gravel packs tightly together and lacks the open void space of angular stone. Dirty quarry gravel full of fine stone dust washes straight into pipe perforations, forming a concrete-like sludge.
- Placing Pipe Holes Facing Up: Laying perforated pipe with holes at the 12 o’clock position forces the water table to rise 4 inches above the pipe before entering, leaving standing water in the trench bottom.
- Neglecting Cleanout Access Risers: Omitting threaded surface cleanout caps prevents you from clearing out root intrusions or sediment build-up down the road.
- Discharging to an Improper Location: Dumping discharge water near a neighbor’s property line, over a sidewalk, or flat against a foundation wall creates localized flooding and code violations.
French Drain Costs: DIY Savings vs. Professional Installation
Deciding whether to tackle a French drain as a weekend DIY project or hire an experienced contractor depends on your budget, available time, and the complexity of the site.
Material costs for a DIY installation typically average $15 to $25 per linear foot. This includes commercial-grade non-woven geotextile fabric, 4-inch perforated pipe, washed #57 crushed stone, fittings, cleanout caps, and a discharge emitter. For a 50-foot DIY run, expect to spend $750 to $1,250 on raw materials, plus $200 to $400 for a one-day trencher rental and basic tool supplies. Taking on the excavation yourself can save between $1,500 and $5,000 in labor fees.
Professional contractor installations range from $60 to $120 per linear foot for standard yard drainage systems, and $3,000 to $10,000+ for full-perimeter foundation waterproofing drains that require deep excavation and mechanical tie-ins. Professional teams supply commercial excavators, handle complex soil disposal, establish precise laser grades, and carry licensing and liability coverage.
Cost Breakdown: Finding the Best Way to Dig a French Drain for Your Budget
When establishing your drainage budget, factor in soil disposal. Digging a 50-foot trench that measures 12 inches wide and 18 inches deep yields roughly 2.8 cubic yards of displaced dirt. Because gravel replaces the excavated space, you must plan for soil haul-away fees or redistribute the fill across your property.
DIY installations are cost-effective for shallow yard runs across unobstructed turf. However, if your drainage line must pass near structural foundation footings, cross underground utilities, or connect to interior systems, hiring a licensed contractor prevents structural settling and moisture intrusion. Reviewing how to build a french drain that actually works helps clarify long-term durability factors before you invest time and money.
Frequently Asked Questions About French Drain Digging
Does digging a French drain trench require a municipal permit?
Shallow surface yard drains that daylight on private property rarely require building permits. However, if your drainage plan involves excavating deeper than 5 feet, connecting directly to a municipal storm sewer lateral, cutting through a public road right-of-way, or working near designated wetlands, municipal approval is mandatory. In Southeast Michigan, review local county drain guidelines and township ordinances before routing runoff toward property lines or public easements.
How deep should a French drain be dug near a home foundation?
For foundation protection, the drain pipe must sit adjacent to the structural concrete footing, typically 4 to 6 feet below grade in Michigan basements. The trench bottom should rest just below the top of the footing without undermining the soil supporting the footing itself. Excavating to this depth relieves hydrostatic pressure against lower basement walls, capturing groundwater before it seeps through cold joints.
Why should perforated drain pipe holes face down in the trench?
Placing perforated pipe holes downward (at the 4 and 8 o’clock positions) allows water to enter from the bottom as the water table rises. As groundwater fills the gravel-lined trench floor, it flows up into the holes and drains downhill through the pipe invert. Placing holes upward requires the trench to flood completely before water reaches the openings, keeping the bottom of your trench saturated with stagnant water.
Conclusion
Digging an effective French drain requires careful planning, consistent trench slope, and high-quality materials. By calling 811 before digging, maintaining a steady 1% downhill gradient, wrapping washed #57 aggregate in non-woven geotextile fabric, and laying perforated pipe holes-down, you create a gravity-fed drainage system that protects your landscape and foundation for 20 years or more.
While shallow yard trenches are manageable DIY projects, deep foundation perimeter systems and chronic basement moisture problems require specialized equipment and structural knowledge. At Michigan Basements, our family-owned team brings specialized foundation expertise, clean workmanship, and no-cost inspections to homeowners throughout Southeast Michigan. Explore our professional drain tile systems to eliminate standing water and safeguard your foundation, or use our online pricing tool to estimate your project costs today.
 Get instant pricing!