


Resources
How to Build a French Drain That Actually Works

The Best Way to Build a French Drain That Actually Works
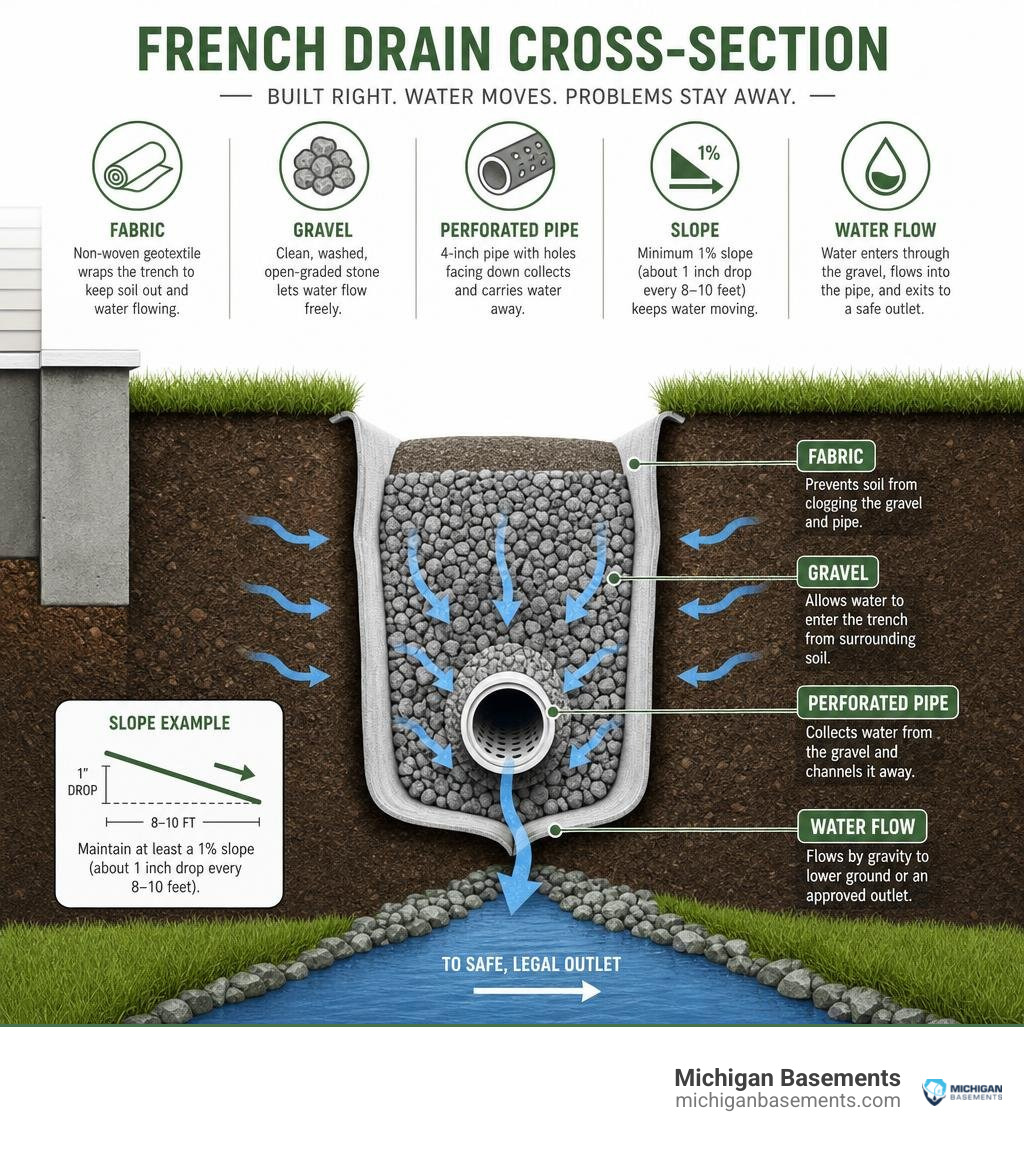
The best way to build a french drain is to install a continuously sloped trench with 4-inch perforated pipe, clean washed drainage stone, and non-woven geotextile fabric, then send the collected water to a safe, legal outlet.
- Plan the route from the wet area to lower ground or another approved discharge point.
- Maintain at least a 1% slope – about 1 inch of drop for every 8 to 10 feet.
- Line the trench with non-woven filter fabric, add a gravel bed, and set the pipe with its holes facing down.
- Cover the pipe with clean, open-graded stone, fold the fabric over the stone, and restore the surface.
A French drain is a subterranean gravel-filled trench that collects groundwater and moves it away by gravity. It is named for Henry Flagg French, who popularized the method in his 1859 book Farm Drainage. Built correctly, it helps lower hydrostatic pressure in saturated soil before that water reaches a foundation, basement, or crawl space.
The details matter. A drain with poor slope, no fabric, fine-filled gravel, or pipe installed holes-up can clog or stop moving water far sooner than it should. A well-planned system with clean stone, proper fabric, and a clear outlet can protect a home for 20 to 30 years or longer.
I am Dominic Hesano, founder of Michigan Basements—a professional basement waterproofing, foundation repair, and yard drainage company serving homeowners across Oakland County, Wayne County, Macomb County, and throughout Southeast Michigan. After years of diagnosing wet basements, crawl space leaks, and foundation drainage problems, I have seen why the best way to build a french drain starts with identifying where the water is coming from and where it can safely go.
Important best way to build a french drain terms:
Understanding Subsurface Water: How a French Drain Works
To build a drainage system that survives decades of heavy rain and spring thaws, we first need to understand subterranean physics. Groundwater does not simply sit still under your lawn; it expands, exerts lateral force, and seeks the path of least resistance.
So, What is a French Drain? At its core, a French drain is an underground conduit designed to manage subterranean water. Unlike standard surface drains that only capture visible surface runoff through top grates, a French drain works beneath the surface layer. Understanding How does a French drain work? comes down to gravity and void space.
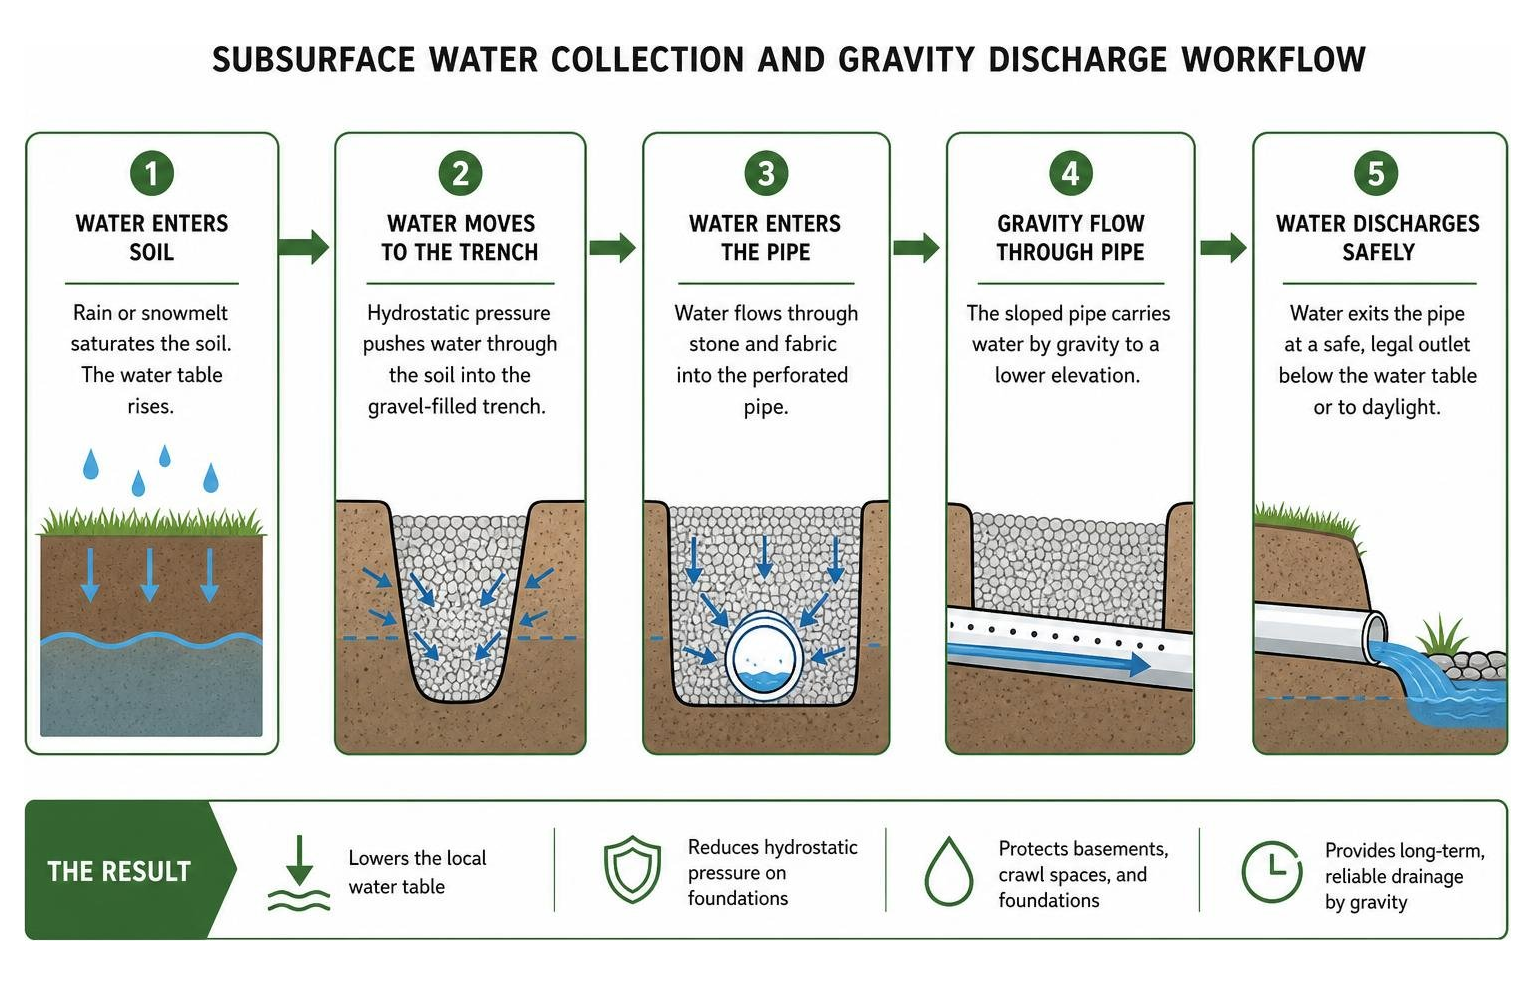
When soil becomes saturated from rain or melting snow, subterranean water levels rise. As the water table ascends into the gravel trench, hydrostatic pressure forces liquid through open void spaces in the washed stone, through the permeable non-woven geotextile liner, and straight into the perforations of the buried pipe. The smooth, sloped invert of the pipe provides far less resistance than surrounding dense earth, carrying gallons of groundwater away to a lower discharge zone before it can saturate your home’s perimeter.
At Michigan Basements, we routinely observe heavy clay soils across Oakland County, Wayne County, and Macomb County trapping subterranean water right up against basement walls. An exterior curtain French drain acts as a relief valve, dropping the local water table around your home and eliminating the lateral hydrostatic pressure that forces moisture through concrete foundation seams.
Comparing Drainage Solutions: French Drains vs. Swales vs. Dry Wells
Homeowners frequently ask us whether a French drain, a surface swale, or a dry well is the correct answer for property water issues. The right choice depends on whether you are fighting surface runoff or rising subsurface groundwater.
- Surface Swales: A swale is a shallow, vegetated ditch sloped to direct surface runoff during heavy storms. Swales are highly effective for rapid overland surface flow across wide lawns, but they do nothing to lower a high subterranean water table resting beneath your grass.
- Dry Wells: A dry well is an underground holding tank surrounded by aggregate designed to store excess runoff and slowly percolate it back into surrounding deep subsoil. Dry wells require highly permeable, sandy soil to function properly. In low-permeability soils like clay, a dry well can become a permanently submerged reservoir.
- French Drains: A subsurface French drain is engineered specifically for continuous subsurface water collection. It collects saturated groundwater along its entire perforated length and evacuates it to daylight or a dedicated discharge location.
For general planning guidance on property water management, review the French Drain Installation Guide to compare surface catch basins against underground perforated pipe networks.
Planning, System Sizing, and Material Selection
Before digging a single shovel of earth, critical pre-planning must take place. Jumping straight into excavation without mapping out route geometry, utility clearances, and material specifications is why roughly 40% of DIY French drains fail within 3 to 5 years.
First, you must call 811 (or your local utility locator) at least 2 to 3 business days prior to digging. Underground gas, electric, fiber optic, and municipal water lines often sit shallower than expected. Additionally, verify your route maintains a minimum 3-foot clearance away from exterior walls, property fence lines, and major tree roots. Digging too close to mature trees can damage roots or cause tree roots to invade your drain trench later.
For complete depth and volume sizing math, check out the detailed calculations inside the French Drain Guide: Gravel, Pipe, Fabric & Slope.
Material Selection: The Best Way to Build a French Drain That Lasts
Selecting inferior materials guarantees early system failure. Soil fines and root intrusion will quickly choke low-grade pipes or improper filter fabrics.
- Pipe Selection: Choosing The best pipe for French drain installations explained comes down to smooth-wall rigid PVC (Schedule 40 or SDR-35) versus flexible corrugated HDPE. While corrugated pipe is cheap and easy to bend around corners, its inner ridges trap silt, encourage algae growth, and make hydro-jetting cleanouts impossible. Rigid smooth-wall PVC maintains a dead-straight slope, resists heavy backfill crushing, and provides a sleek interior surface that easily clears sediment.
- Filter Fabric: Never use cheap woven landscape weed barrier! Woven fabric relies on tiny square weaves that clog with fine clay within 24 to 36 months, sealing off the trench. Always use non-woven needle-punched geotextile fabric (4 oz to 6 oz weight). Non-woven fabric looks like felt, allowing maximum water flow rates while trapping microscopic dirt particles.
- Aggregate Choice: Reviewing The homeowner’s guide to selecting the best gravel for French drains highlights why stone geometry is critical. Always select #57 washed angular crushed stone or 3/4-inch to 1.5-inch washed round gravel. Never use pea gravel, crusher run, or screenings. Rounded pea gravel packs tightly together and lacks open void space, while crusher run contains fine stone dust that compacts into concrete-like sludge, choking your system within a few seasons. Washed #57 stone maintains 40% to 45% open void space for unimpeded water velocity.
Calculating Slope and Outlet Options: The Best Way to Build a French Drain Flow Path
Gravity moves the water, so establishing a continuous downhill slope is non-negotiable. Determining How deep should a French drain be? requires calculating line-of-fall math.
A French drain must slope downhill at a minimum gradient of 1% (which translates to a 1-inch drop for every 8 to 10 linear feet of trench run). On flat properties, aim for a 1.5% to 2% grade buffer for added insurance against standing water. Use a string level, transit level, or rotary laser level to establish your high point baseline and plot your depth at every 10-foot mark.
| Soil Type | Recommended Trench Depth | Recommended Trench Width | Required Aggregate Cushion |
|---|---|---|---|
| Sandy / Loam Soil | 18 to 24 inches | 10 to 12 inches | 2 to 3 inches base / side wrap |
| Standard Clay Soil | 20 to 26 inches | 12 to 16 inches | 3 to 4 inches base / side wrap |
| Heavy Clay / High Water Table | 24 to 30 inches | 18 to 24 inches | 4 to 6 inches base / side wrap |
Once water enters the pipe, it must discharge safely. Common exit options include:
- Daylight Discharge: Exiting out to an exposed slope on lower ground (fitted with a protective wire rodent grate).
- Pop-Up Emitter: Discharging near the surface level away from structures, where hydro-pressure pops up a green lid to disperse water across a healthy lawn area.
- Dry Well Catchment: Gravity-feeding into a subterranean containment barrel located at least 10 to 15 feet away from home footings.
Step-by-Step Execution: The Best Way to Build a French Drain
Executing the installation properly requires precise layering. Think of a high-performing French drain as a protective “burrito wrap” of gravel and pipe completely insulated from surrounding raw earth.
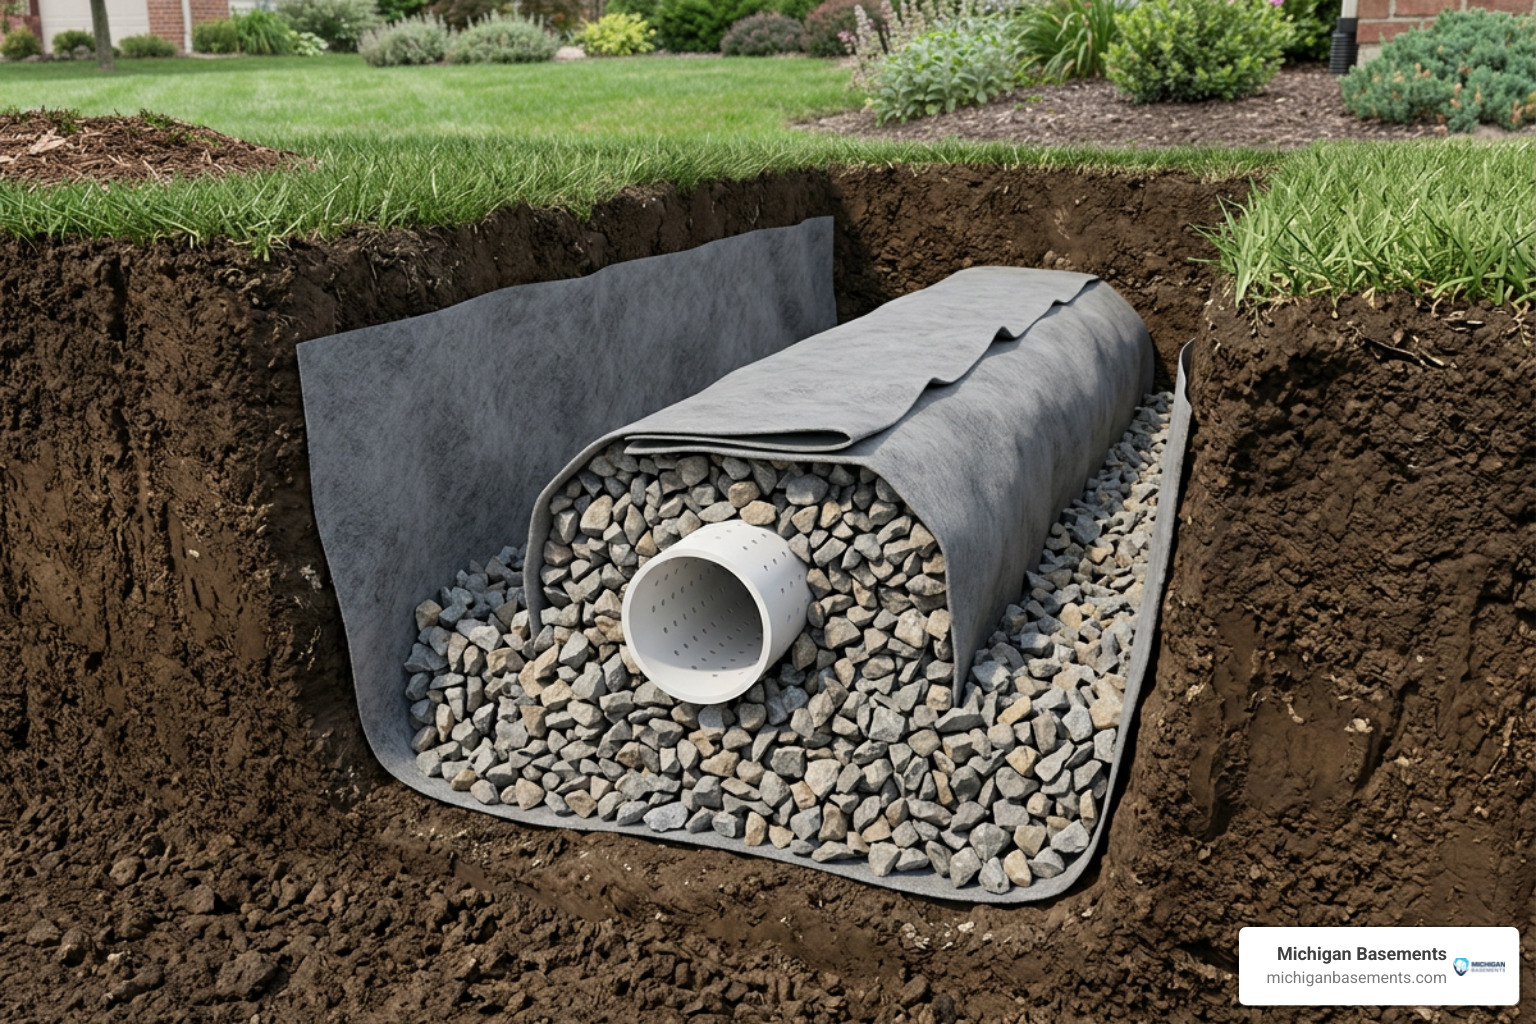
Follow these definitive steps outlined in our guide on How to install a French drain in 7 easy steps:
- Excavate the Trench: Dig your trench maintaining your calculated 1% slope downhill. Ensure trench walls are smooth and free of sharp rocks or invasive roots.
- Lay the Non-Woven Geotextile Fabric: Unroll 4 oz or 6 oz non-woven geotextile fabric down the entire trench. Ensure enough fabric overhangs on both sides (typically 12 to 18 inches of excess per side) so it can be folded over the top later.
- Pour the Aggregate Base Bedding: Dump 2 to 3 inches of clean washed #57 aggregate directly onto the fabric at the trench bottom. Smooth the stone by hand to form a firm, uniform bedding floor.
- Set the Perforated Pipe (Holes DOWN): Lay your 4-inch perforated rigid PVC pipe directly onto the gravel bed. Critical Step: Ensure the pipe perforations are oriented facing DOWN toward the 4 o’clock and 8 o’clock positions.
- Backfill with Clean Stone: Shovel washed angular aggregate over and around the pipe until the stone layer reaches within 4 to 6 inches of top grade surface.
- Execute the “Burrito” Fold: Take the excess non-woven fabric overhang from both sides and fold it over the top of the gravel bed. Ensure fabric edges overlap by at least 6 to 12 inches to form a complete filter envelope around the stone.
- Backfill and Turf Restoration: Cover the wrapped fabric envelope with coarse builder’s sand or native topsoil, tamping lightly in stages to force settling, and finish by laying fresh sod or grass seed over top.
Testing Water Flow and Verifying Slope Before Backfilling
Before folding the fabric wrap and shoveling topsoil back over your installation, perform a quick physical verification test.
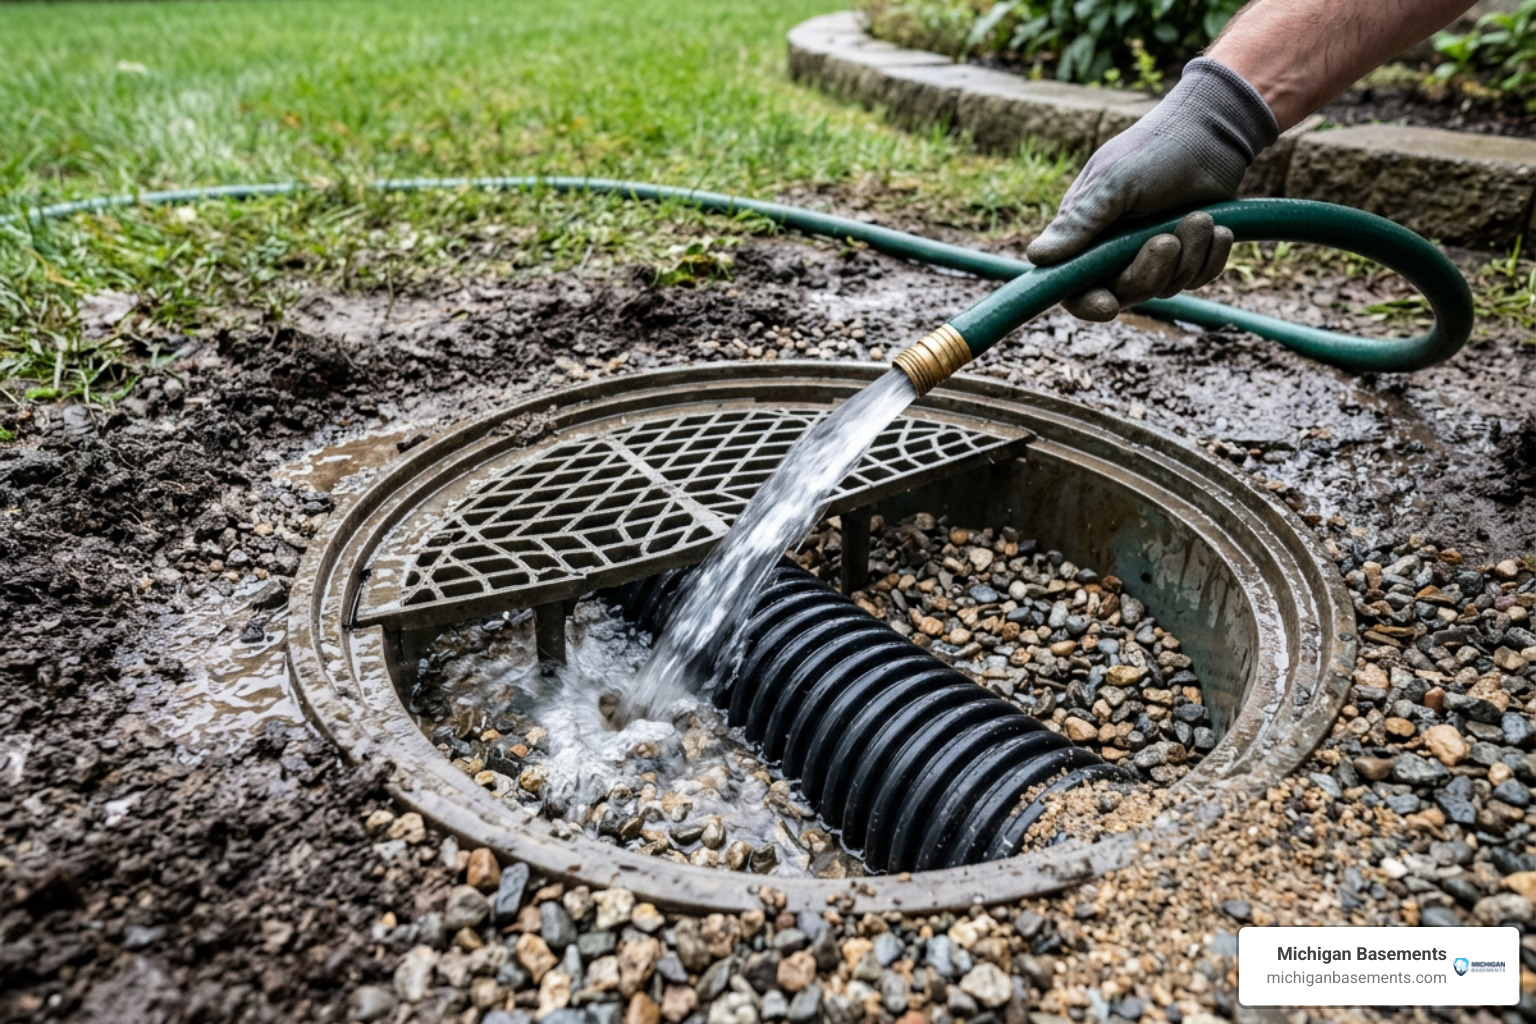
Run a garden hose into the upper entry end or catch basin of your French drain for 5 to 10 minutes. Stand at the lower exit outlet and watch the flow rate. Water should flow immediately out of the exit end without any delay or backup inside the pipe. If water ponds or sluggishly lingers in middle sections, you have an improper drop or a “belly” (dip) in your trench grade that must be leveled out before backfilling.
Critical Installation Mistakes and Preventive Maintenance
Why do so many DIY installations fail prematurely? Minor execution shortcuts early on create major drainage blockages down the road.
The primary mistakes that cause system failures include:
- Placing Pipe Holes Facing UP: Placing perforations facing upward forces groundwater to flood the entire trench all the way to the top of the pipe before any liquid enters the drain conduit. Furthermore, top-facing holes act as funnels for falling soil sediment. Holes-up orientation reduces system drainage capacity by 40% to 60%.
- Omitting Geotextile Fabric: Skipping filter fabric allows ambient fine soil and clay particles to migrate into aggregate open spaces. Over 3 to 5 years, dirt silts up stone gaps, transforming free-flowing aggregate into solid mud.
- Tying Roof Downspouts into Perforated Pipe: Never cross-connect gutter downspouts directly into your perforated French drain! Roof runoff carries shingle grit, leaves, and organic debris. Injecting high-volume roof water into a perforated ground pipe will blow shingle grit out through pipe holes into your aggregate while easily surcharging your trench capacity. Keep roof runoff in separate, solid non-perforated PVC lines.
- Pipe Bellies: Digging uneven trench floors creates low spots where sediment accumulates and water permanently pools.
For additional field breakdown insights, review How to install a French drain step-by-step.
Long-Term Maintenance for 20 to 30 Year System Lifespan
A properly constructed system wrapped in quality fabric requires minimal effort, but routine checkups guarantee decades of trouble-free performance. Read our complete walkthrough on How to clean a French drain to keep your system performing at peak efficiency.
- Install Cleanout Risers: Every 50 to 100 feet along your drain run (and at any 90-degree turns), install a vertical PVC tee riser extending up to surface level capped with a threaded plug. This cleanout port allows access for hydro-jetting equipment or a rotary drain auger if roots ever invade the system.
- Annual Outlet Inspection: Inspect exit grates or pop-up emitters every spring and autumn. Clear away leaves, lawn mower clippings, and animal nests that might block gravity discharge.
- Preventing Basement Water Intrusion: Review French Drains & Basement Moisture to understand how exterior yard drainage interacts with foundation footing systems to maintain dry lower levels.
Cost Analysis: DIY vs. Professional Installation
When planning a yard drainage project, understanding realistic material and labor costs helps establish your project scope. Learn more about budgeting options in Don’t be drained by yard flooding.
- DIY Installation Costs: DIY material costs generally range from $8 to $15 per linear foot. For a standard 50-foot exterior yard drain, expect to spend $400 to $750 on washed aggregate, rigid PVC pipe, non-woven fabric, fittings, and topsoil, plus an additional $150 to $350 per day if you rent a mechanical walk-behind trencher.
- Professional Installation Costs: Professional contractor installation typically runs $25 to $50 per linear foot for straightforward yard drainage runs, and $80 to $150+ per linear foot for deep perimeter foundation drains requiring heavy machinery, utility hand-digging, and foundation membrane integration.
When should you hire a professional drainage contractor instead of tackling DIY?
- When your trench must sit deeper than 3 feet near home foundation footings.
- When you are dealing with heavy clay soil that requires mechanical excavation equipment.
- When water is actively seeping through basement walls or foundation floor cracks due to high hydrostatic pressure.
- When your property has zero natural fall, requiring a submerged sump basin and pump system installation.
Frequently Asked Questions About French Drain Installation
Should French drain pipe holes face up or down?
Perforated French drain pipe holes must always face DOWN (oriented toward the 4 o’clock and 8 o’clock positions). Groundwater levels rise from beneath the trench as soil becomes saturated. Placing holes facing down allows rising water to enter the pipe immediately at the trench base while preventing surface dirt from settling directly into the pipe perforations.
Can you tie roof downspouts directly into a French drain?
No. Roof downspouts should never be connected into a perforated French drain. Roof downspout runoff carries shingle grit, leaves, and heavy volumes of water that will quickly clog perforated pipe holes and overflow your gravel trench. Always route gutter downspouts into separate, solid (non-perforated) PVC discharge lines.
How long does a properly built French drain last?
A high-quality French drain built with smooth-wall rigid PVC pipe, clean washed #57 aggregate, and non-woven geotextile filter fabric will reliably last 20 to 30+ years. Conversely, systems installed without filter fabric or built using improper gravel usually silt up and fail within 3 to 5 years.
Conclusion
Building an effective French drain requires accurate slope math, high-grade non-woven fabric, clean angular stone, and correct pipe placement. By taking the time to design your system properly from the ground up, you can protect your property, lawn, and home foundation from costly moisture damage for decades to come.
If you live in Southeast Michigan—including Oakland County, Macomb County, or Wayne County—and are dealing with severe property pooling, wet crawl spaces, or basement foundation leaks, Michigan Basements is here to help. Explore Our Services to discover our family-owned expertise, no-cost initial inspections, clean workmanship, and customer-first approach.
For severe groundwater challenges beneath home slabs, our professional Drain Tile Systems offer structural protection designed specifically for Michigan soils. Contact our team today to schedule your complimentary drainage evaluation!
 Get instant pricing!